How to Make a Salt Volcano
What is a Salt Volcano?
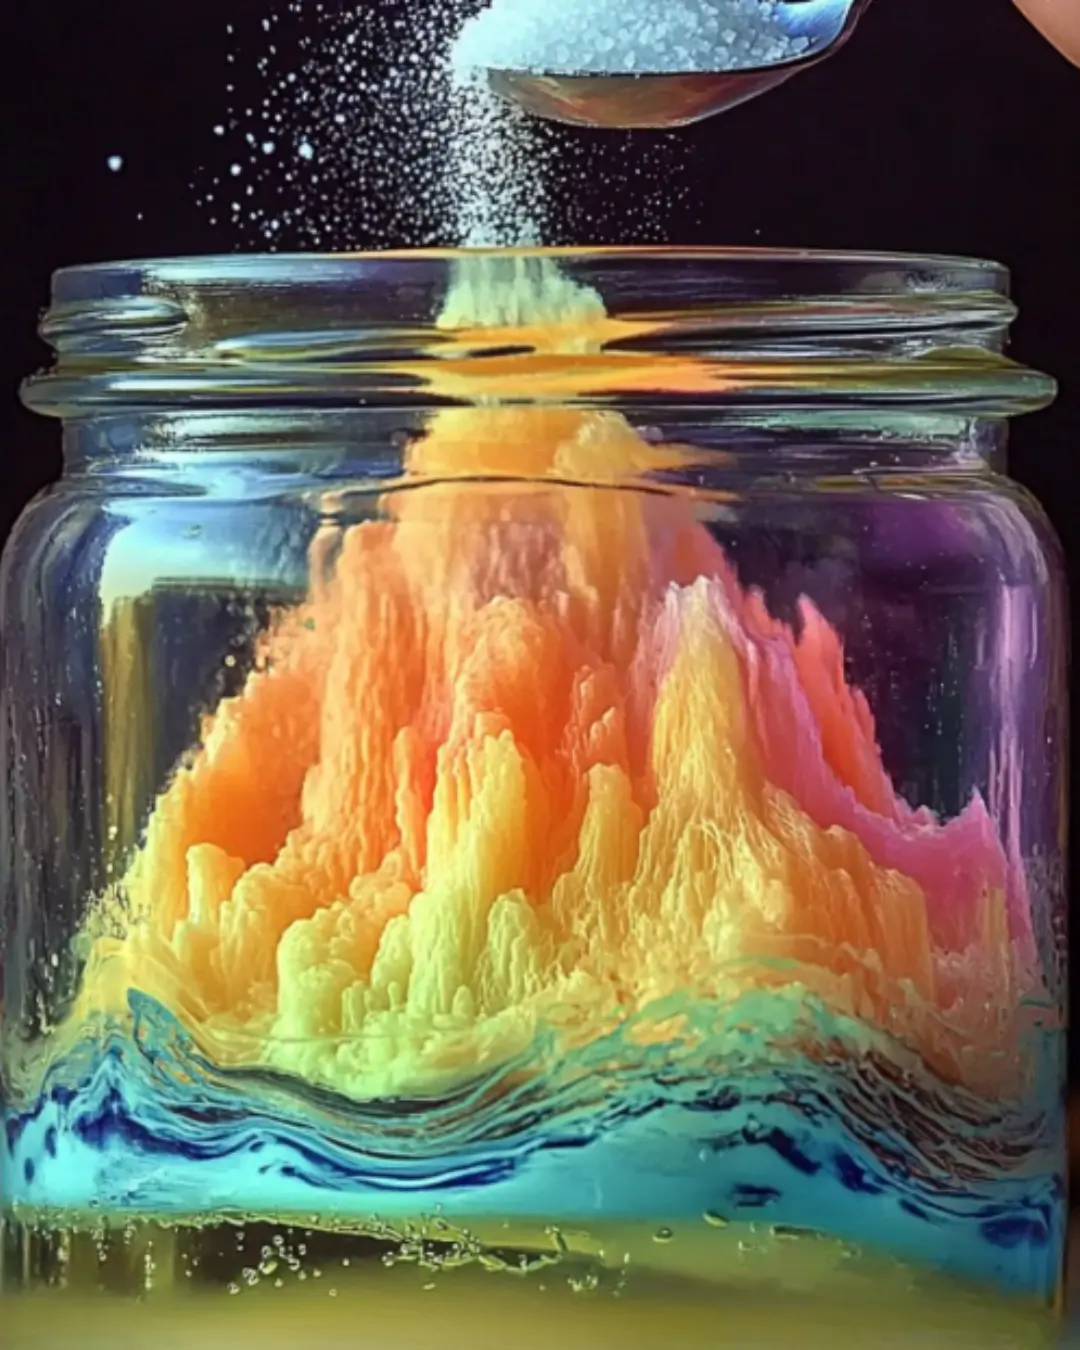
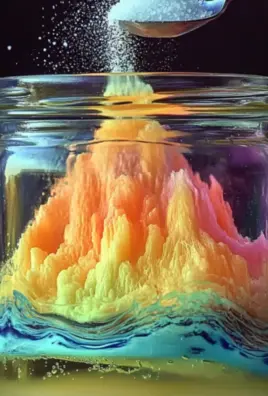
The salt volcano is a dazzling mini science experiment that brings the principles of chemistry to life—right inside a clear glass jar. With just a few pantry staples like salt, vegetable oil, water, and food coloring, this vibrant activity mimics a lava lamp’s hypnotic motion, offering an exciting visual experience. As you sprinkle salt into a jar of oil and water, a surprising reaction takes place: the salt drags oil to the bottom and then lets it rise, causing colorful eruptions that seem to bubble and dance!
Perfect for kids and adults alike, this hands-on experiment is an engaging way to explore density, solubility, and chemical reactions. Whether you’re teaching a class, hosting a rainy-day activity, or just love a bit of kitchen science, the salt volcano never fails to impress.
🎉 Why You’ll Love This Salt Volcano Experiment
- Super simple ingredients – All you need are common household items.
- Stunning results – Watch vibrant “lava” bubble and rise.
- Educational value – Demonstrates density, solubility, and fluid dynamics.
- Mess-free fun – No heat, no harsh chemicals, and totally safe.
- Perfect for all ages – Fun for kids, satisfying for adults, and adaptable for classrooms.
🧰 Preparation Phase & Tools to Use
Before you get started, gather your materials and clear a workspace. The setup takes just a few minutes but delivers big visual impact.
🔧 Essential Tools and Equipment
| Tool | Purpose |
|---|---|
| Clear jar or glass | To visualize the layers and reactions clearly |
| Measuring cup | For precise measurement of water and oil |
| Spoon | To sprinkle salt gradually |
| Flashlight (optional) | Enhances visual effect from below |
| Food coloring (optional) | Adds vibrant, eye-catching colors |
🔍 Importance of Each Tool
- Clear jar – Essential for seeing the salt volcano reaction in action.
- Measuring tools – Ensure you have the right ratio for the best eruption.
- Spoon – Controls salt addition to moderate the fizzing effect.
- Flashlight – Makes the bubbling “lava” look magical from underneath.
🧼 Preparation Tips
- Lay down paper towels or a tray to catch any spills.
- Use room-temperature water—extreme temperatures may affect the reaction.
- Test the food coloring beforehand; some gels don’t mix well in oil.
- Have kids wear old clothes or aprons if using dark food coloring.
- Optional: use a science journal to record observations!
🧪 Ingredients List
| Ingredient | Amount |
|---|---|
| Room-temperature water | 1 cup |
| Vegetable oil | 1/4 cup |
| Salt (any kind: table or rock salt) | As needed |
| Food coloring (optional) | A few drops |
| Clear jar or glass | 1 |
📋 Step-by-Step Directions for the Salt Volcano
- Pour Water into the Jar
- Add 1 cup of room-temperature water to your clear glass or jar.
- Leave a little space at the top to prevent overflow during the eruption.
- Add the Vegetable Oil
- Slowly pour in 1/4 cup of vegetable oil.
- Let it settle—oil floats on top of water due to its lower density.
- Add Food Coloring (Optional but Fun!)
- Drop 2–4 drops of food coloring into the oil.
- Watch as the color passes through the oil layer and mixes into the water below.
- Start the Eruption
- Sprinkle a heaping spoonful of salt into the jar.
- Observe how the salt carries droplets of oil to the bottom, then releases them, causing them to float and bubble back up.
- Repeat the Fun!
- Add small amounts of salt every 30–60 seconds to keep the salt volcano erupting.
- Try different quantities and types of salt for varying eruption effects.
- Optional: Light It Up
- Place a flashlight beneath the jar to create a glowing, lava-lamp effect.
- Works great in a dim room!
🌈 Tips & Variations for Maximum Fun
- 🟢 Use different salts: Try rock salt, kosher salt, or sea salt to see how eruption speed changes.
- 🔵 Color layering: Add multiple food coloring shades in drops for a rainbow salt volcano.
- 🟣 Use glitter (carefully): Add sparkle, but be cautious about cleanup.
- 🟡 Add a science journal: Let kids record what they observe during each eruption.
- 🔴 Pair with a density lesson: Use this as an intro to liquid density and solubility science.
🧠 Science Behind the Salt Volcano
Here’s a quick explanation of the cool chemistry at work:
- Oil floats on water because it is less dense.
- When salt is added, it temporarily drags some of the oil down to the bottom.
- As the salt dissolves, the oil is released and floats back up, creating a bubbling effect.
- Food coloring enhances visibility but doesn’t affect the science—it just makes it awesome to look at!
Enhance the Experience & Explore More with Your Salt Volcano
🥳 Creative Ways to Present Your Salt Volcano
Even though it’s a science experiment, the salt volcano can be presented in fun and engaging ways. Make it part of a themed learning day, party activity, or STEM presentation.
📦 Serving Suggestions for the Experience
- Create a “Mini Science Lab”: Set up multiple jars with different oil colors for a rainbow science station.
- Science Party Favor: Pre-package the ingredients in a small box labeled “DIY Lava Lab.”
- Classroom Display: Showcase a glowing jar on a light-up base during open house or science night.
- Themed Placemat: Place the jar on a volcano-themed mat showing labeled layers.
- Add a Magnifying Glass: Let kids view the bubbles up close.
- Use Clear Plastic Cups: Make mini salt volcanoes as take-home projects.
- Pair with a Lab Sheet: Kids can write down what they see, predict outcomes, and record results.
- Present with a Story: Turn the bubbling lava into a fantasy tale—great for younger learners.
⚠️ Common Mistakes to Avoid
Prevent frustration and ensure your salt volcano erupts beautifully every time. Here are the most frequent issues and how to fix them.
❌ Mistake 1: Using Cold or Hot Water
- Fix: Always use room-temperature water to maintain consistent density separation.
❌ Mistake 2: Overfilling the Jar
- Fix: Leave at least an inch at the top to allow space for the eruption effect.
❌ Mistake 3: Adding Too Much Salt Too Fast
- Fix: Sprinkle slowly in spoonfuls to avoid overwhelming the reaction and clouding the jar.
❌ Mistake 4: Shaking or Stirring the Jar
- Fix: Let the layers settle. Stirring disrupts the separation of oil and water.
❌ Mistake 5: Using Too Little Salt
- Fix: Make sure enough salt is added to carry oil to the bottom.
❌ Mistake 6: Using Food Gel Instead of Liquid
- Fix: Use liquid food coloring. Gel coloring may not mix properly or sink through the oil.
❌ Mistake 7: Using an Opaque Container
- Fix: Always use a clear glass jar to clearly see the color separation and bubbling reaction.
❌ Mistake 8: Not Supervising Young Children
- Fix: Though safe, adult supervision ensures controlled use of materials like food coloring and salt.
🧪 How to Perfect Your Salt Volcano
Want maximum fizz and vibrant visual impact? Follow these expert tricks to fine-tune your salt volcano.
🔍 Experiment with Salt Types
- Rock Salt: Creates slower, chunkier eruptions.
- Table Salt: Fast and fizzy.
- Kosher Salt: Moderate fizzing with a cool texture.
🔄 Adjust Salt Quantities
- Start small and build up.
- Use a spoon—not a shaker—for better control.
- Let each reaction finish before adding more salt.
💡 Try Color Mixing
- Layer multiple food colors into the oil layer.
- Use red + blue = purple effect in the water layer.
- Mix primary colors for learning opportunities!
🔬 Extend Learning
- Pair with a mini lesson on liquid density and chemical reactions.
- Have kids predict and record results using a worksheet or journal.
🍽️ 8 Side Experiments to Pair with Your Salt Volcano
Make the salt volcano the center of a full science activity day! Here are eight hands-on side experiments that reinforce similar concepts of density, chemical reactions, and visual science.
🧼 1. Baking Soda Volcano
- Combine baking soda and vinegar for a classic foaming eruption.
- Add red food coloring for a lava effect.
💧 2. Liquid Density Tower
- Layer oil, water, syrup, and soap to teach about density.
- Drop objects in to see where they float.
🌈 3. Color-Mixing Jar
- Use primary colors in separate oil sections.
- Watch them blend and react in water.
🌪️ 4. Tornado in a Jar
- Fill a jar with water and dish soap.
- Swirl in a circle to form a spinning vortex.
🌊 5. Ocean in a Bottle
- Create wave motion with oil and blue-dyed water.
- Add sea shells or glitter for fun.
🧃 6. Dancing Raisins
- Drop raisins into sparkling water.
- Watch them rise and fall as bubbles attach.
🌟 7. Glitter Lava Lamp
- Add glitter and Alka-Seltzer to oil and water.
- Watch sparkling eruptions occur repeatedly.
🧊 8. Melting Ice with Salt
- Sprinkle salt on ice cubes with food dye.
- Watch tunnels form as the salt melts pathways through the ice.
Expert Tips, Storage, FAQs & Final Thoughts on Your Salt Volcano
🧙♂️ Pro-Level Tips to Elevate Your Salt Volcano
Ready to take your salt volcano to the next level? These tips turn a basic activity into an immersive learning experience or eye-catching display.
🔬 Advanced Experimenting
- Measure Reaction Time: Use a timer to track how long each eruption lasts with different salts.
- Salt Layering Test: Add salt slowly to see how the intensity changes over time.
- Oil Type Comparison: Try vegetable, olive, baby, or coconut oil to explore visual and reaction differences.
📸 Make It Insta-Worthy
- Use a backlit surface or LED base for professional-looking photos or videos.
- Add a black background behind the jar for better color contrast.
- Record the experiment in slow motion to capture bubble movements.
🧑🏫 Use for Education
- Pair with a science worksheet on density, buoyancy, and chemical reactions.
- Host a STEM day demo using multiple jars and color themes.
- Have kids hypothesize before experimenting and explain their observations afterward.
🧊 Storage and Reuse Instructions
Although the salt volcano experiment isn’t reusable indefinitely, you can store the setup for short-term reuse and repeat demonstrations.
🫙 How to Store the Jar
- Cover the jar with a lid or plastic wrap to prevent dust and evaporation.
- Store at room temperature, away from direct sunlight.
- Label the jar if saving for a classroom or repeat use.
🔁 How to Reuse the Setup
- You can add more salt later to recreate the reaction.
- If food coloring has fully blended, consider starting fresh for better contrast.
- After a few uses (or a cloudy appearance), rinse and replace the ingredients.
🗑️ Disposal Tips
- Do not pour oil down the drain.
- Instead, wipe out excess oil with paper towels and dispose in the trash.
- Wash the jar with warm, soapy water.
❓ Frequently Asked Questions (FAQs)
📌 What causes the salt volcano to bubble?
The bubbling occurs when salt carries oil droplets down through water. Once the salt dissolves, the oil floats back up, creating an upward fizz that looks like a lava lamp.
📌 Can I use different types of salt?
Yes! Try:
- Table salt – Fast reaction
- Rock salt – Slow and chunky
- Kosher salt – Moderate fizz
Each changes the speed and intensity of the bubbling.
📌 Is this safe for young children?
Absolutely. The materials are non-toxic, but young children should be supervised, especially when handling food coloring and glass jars.
📌 How long does the reaction last?
Each spoonful of salt causes fizzing for about 30–60 seconds. You can repeat the reaction multiple times by adding more salt.
📌 Can I do this without food coloring?
Yes, the reaction works the same. Food coloring just adds visual appeal and contrast between the oil and water.
📌 Why doesn’t the oil mix with water?
Oil is less dense than water and non-polar, so it naturally floats on top and doesn’t mix.
📌 What’s the scientific concept behind this?
This experiment demonstrates:
- Density
- Buoyancy
- Solubility
- Immiscible liquids
- It also introduces concepts of molecular polarity.
📌 Can I use this for a science fair?
Definitely! It’s an ideal visual demo. Include:
- A hypothesis
- Step-by-step process
- Results and conclusion
- A chart comparing reactions with different salts or oils
📌 Can I mix this with a baking soda and vinegar volcano?
They operate on different chemical principles. However, you can display both for a “volcano comparison” activity during a science showcase.
📌 Is it okay to touch the jar during the reaction?
Yes, but don’t shake or stir it. That will disrupt the separation of oil and water and may make the jar cloudy.
✅ Conclusion: Why the Salt Volcano Never Gets Old
The salt volcano is proof that you don’t need fancy ingredients to make science exciting. With a clear jar, a few kitchen staples, and a sprinkle of salt, you unlock a vibrant display of chemistry in action.
Whether you’re a teacher looking to inspire your students, a parent creating magical moments at home, or just someone who loves creative science, this experiment delivers. It’s safe, sensory-friendly, repeatable, and completely mesmerizing.
So grab your jar, drop in some salt, and let the lava rise!


Leave a Comment