These red velvet brownies are the ultimate combination of rich cocoa flavor, a hint of tang, and indulgent sweetness. With their vibrant red color and soft, fudgy texture, they offer a fun twist on the traditional brownie. Studded with creamy white chocolate chips and baked to gooey perfection, this dessert is ideal for holidays, special occasions, or any time you’re craving something unforgettable.
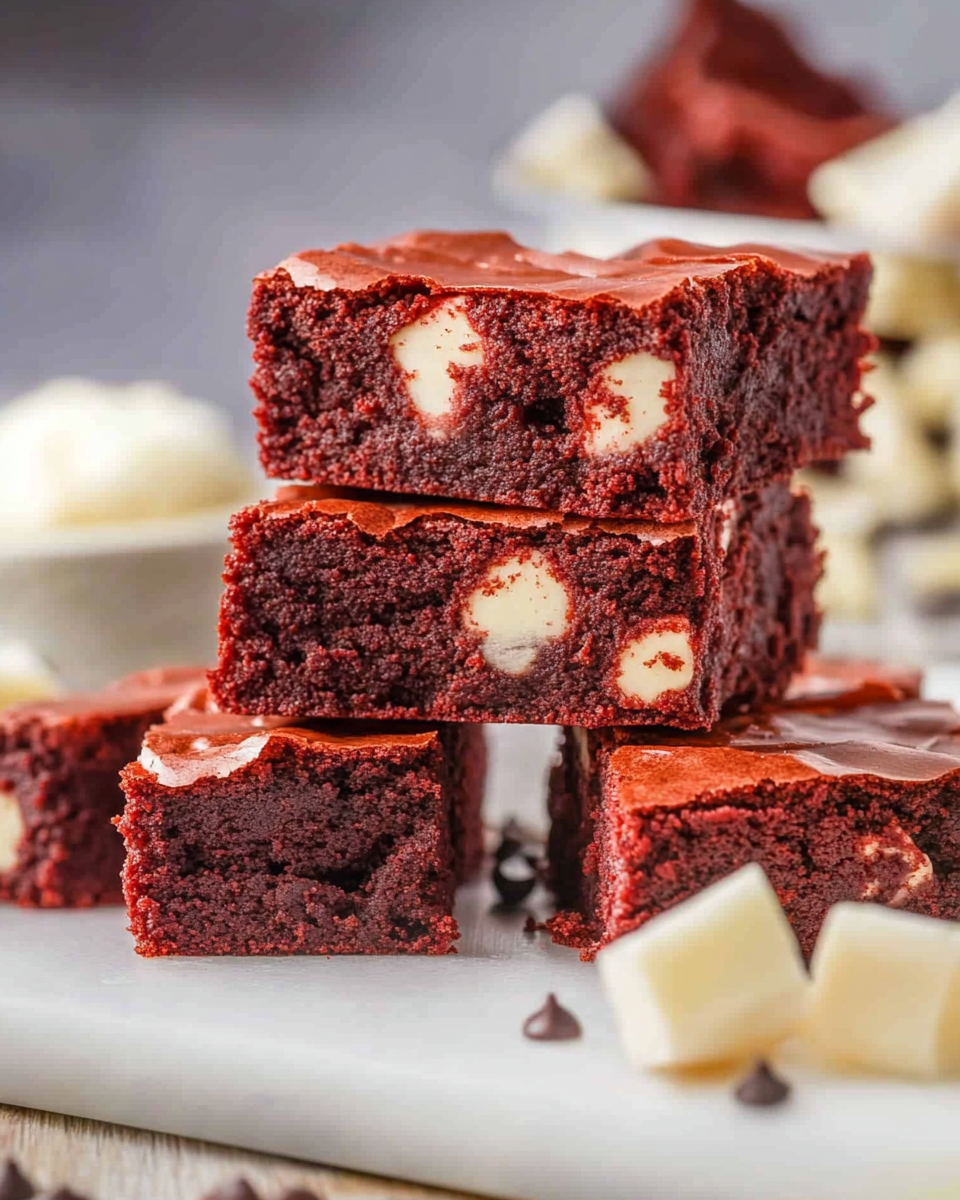
Unlike cake-style brownies, these are dense and chewy with a crisp top and soft center. The white chocolate provides a creamy contrast to the cocoa, while the red food coloring gives it that signature red velvet appeal. Whether you’re baking for Valentine’s Day, Christmas, or a casual get-together, these brownies are sure to impress.
What Makes This Recipe Special
There are many reasons to fall in love with this recipe. These brownies are:
- Easy to make in one bowl
- Made with pantry staples
- Perfectly balanced in sweetness and cocoa flavor
- Visually stunning with a bright red hue
- Great for gifting, parties, and holiday spreads
The addition of vinegar may seem unusual in a brownie recipe, but it’s essential to achieving that classic red velvet taste. It reacts with the cocoa and eggs, enhancing the color and adding a light tang that sets these brownies apart.
Tools You’ll Need to Make Red Velvet Brownies
To prepare the best red velvet brownies, it’s important to use the right tools. Here’s what you’ll need:
- Large mixing bowl – For combining all the ingredients
- Whisk or silicone spatula – To mix the batter without overworking it
- Measuring cups and spoons – For accuracy
- 9×9-inch baking pan – Ideal size for thick, even brownies
- Parchment paper – Makes removing the brownies easier and cleaner
- Nonstick cooking spray – Ensures the brownies don’t stick
- Toothpick or cake tester – Helps check doneness
Why Each Tool Matters
Using the right size pan ensures your brownies bake evenly without overcooking or undercooking. Parchment paper prevents sticking and makes lifting the brownies out of the pan easier. A whisk or silicone spatula helps mix ingredients efficiently without incorporating too much air, keeping the brownies dense and moist.
Pro Tips for Perfect Preparation
- Allow the melted butter to cool slightly before mixing with the sugar and cocoa. This helps prevent scrambled eggs when added.
- Use room temperature eggs to ensure they blend smoothly into the batter.
- Add the red food coloring gradually. Start with 7 drops and increase to achieve your preferred shade of red.
- Mix the batter just until combined to avoid a tough texture.
Organized Ingredient List
Here’s a complete list of what you’ll need for this red velvet brownies recipe:
- 12 tablespoons unsalted butter, melted
- 5 tablespoons unsweetened cocoa powder
- ½ teaspoon table salt
- 1¼ cups granulated sugar
- 3 large eggs
- ¾ teaspoon vanilla extract
- ¾ teaspoon white vinegar
- 1 cup all-purpose flour
- 10–12 drops Wilton red food coloring (adjust to your liking)
- 1 cup white chocolate chips, divided
Step-by-Step Instructions
- Preheat your oven to 350°F (175°C). Line a 9×9-inch baking pan with parchment paper and lightly spray with nonstick cooking spray.
- In a large bowl, whisk together melted butter, cocoa powder, salt, and sugar until smooth and well combined.
- Add the eggs, vanilla extract, and vinegar. Stir until the mixture is thick and glossy.
- Gently fold in the flour. Before the flour is fully mixed in, begin adding red food coloring, starting with 7 drops. Add more as needed until you reach a rich red hue.
- Fold in ½ cup of white chocolate chips.
- Pour the batter into the prepared pan and smooth the top with a spatula.
- Sprinkle the remaining ½ cup of white chocolate chips evenly over the surface.
- Bake for 22 to 25 minutes. Insert a toothpick in the center—if it comes out with a few moist crumbs, the brownies are done.
- Let the brownies cool in the pan for at least 1 hour before slicing. This helps them set and creates clean edges.
This recipe makes 12 rich, fudgy brownies that are as beautiful as they are delicious. For best results, don’t rush the cooling time, and use parchment paper to ensure easy removal from the pan.
Serving Suggestions and Pairings for Red Velvet Brownies
Once you’ve baked a batch of red velvet brownies, the next step is deciding how to serve them. These rich, fudgy treats are delicious straight from the pan, but they also shine when paired with the right toppings and sides. Their bold color and deep cocoa flavor make them versatile enough for elegant platings or casual indulgence.
Creative Serving Ideas
Red velvet brownies are crowd-pleasers that can be dressed up or served simply. Here are some standout ways to serve them:
- Warm with ice cream: A scoop of vanilla or cream cheese ice cream adds contrast to the warm, chewy brownie. This is an excellent dessert idea for dinner parties.
- Drizzled with melted white chocolate: Enhance the creamy notes of the white chocolate chips already in the brownies by melting additional chips and drizzling over each square.
- With whipped cream and berries: A light topping of fresh whipped cream and a few raspberries or strawberries balance the richness and add a fresh, tart element.
- Cut into shapes: Use cookie cutters to make heart-shaped brownies for Valentine’s Day or other festive shapes for themed events.
- Layered in a dessert parfait: Crumble the brownies into glasses with layers of cream cheese frosting or mousse and fruit for a show-stopping layered dessert.
- As brownie bites: Cut them into small squares and serve them on a dessert board with other sweets like macarons, fruit, or mini cupcakes.
Common Mistakes to Avoid When Making Red Velvet Brownies
Even simple recipes like red velvet brownies can go wrong if you’re not careful. Here are the most frequent mistakes and how to avoid them.
1. Overbaking the Brownies
Overbaked brownies become dry and cakey. The secret to the perfect red velvet brownie is baking just until the edges are set and the center is still a little gooey. A toothpick inserted should come out with a few moist crumbs, not clean.
2. Using Too Much Food Coloring
Red food coloring is powerful. Adding too much can result in a chemical aftertaste and overly bright appearance. Start with a small amount—about 7 drops—and add more until you reach your desired red tone.
3. Skipping the Vinegar
Vinegar might seem like an odd ingredient, but it’s essential in red velvet baking. It reacts with the cocoa powder and enhances the deep flavor while also contributing to the tender texture. Don’t omit it.
4. Not Using Parchment Paper
Using parchment paper ensures that the brownies won’t stick and helps achieve cleaner slices. It also makes it easier to lift the brownies out of the pan for cooling and cutting.
5. Overmixing the Batter
Too much stirring activates the gluten in the flour, which can lead to tough brownies. Mix just until the flour disappears and everything is combined.
Side Dishes That Pair Perfectly
To balance out the richness of red velvet brownies, consider serving them with lighter or complementary side dishes. Here are eight excellent options:
- Fresh Berry Salad
A mix of strawberries, raspberries, and blueberries adds freshness and color to your dessert plate. Lightly toss with a hint of lemon juice and honey. - Cream Cheese Mousse
A nod to the classic red velvet cake pairing, this mousse is light, airy, and just sweet enough to balance the brownie’s richness. - Espresso or Black Coffee
A bold cup of coffee enhances the deep cocoa notes in the brownies. The bitterness contrasts with the sweetness for a balanced bite. - Salted Caramel Drizzle
The sweet-salty flavor of caramel complements the chocolate and adds an extra layer of decadence. - Mint Chocolate Chip Ice Cream
Mint adds a refreshing coolness, while the chocolate complements the brownie’s fudgy base. - Coconut Whipped Cream
Dairy-free and light, this pairs well for anyone with dietary restrictions. The tropical flavor also contrasts beautifully with red velvet. - Vanilla Custard Cups
Smooth and creamy, vanilla custard helps mellow the intensity of the cocoa and adds a luxurious mouthfeel. - Lemon Sorbet
For a fresh, zesty pairing, lemon sorbet offers a palate cleanser that enhances the chocolate and balances the overall sweetness.
Recipe Tips for Best Results
Creating a perfect batch of red velvet brownies is simple, but a few expert techniques can elevate your results. These tips are especially useful if you’re planning to bake these brownies for a special occasion or want consistently perfect texture.
- Cool completely before slicing: Red velvet brownies continue to set as they cool. Cutting into them too early can make them crumble and lose their structure.
- Use a plastic knife: For clean edges, especially when the brownies are rich and fudgy, use a plastic knife or a non-serrated blade wiped clean between each cut.
- Test with a toothpick: Don’t wait for the toothpick to come out dry. A few moist crumbs mean your brownies will be soft and chewy, not overbaked.
- Add-ins and variations: Mix in chopped pecans, crushed Oreos, or mini marshmallows for added texture and flavor. A cream cheese swirl can also transform these into red velvet cheesecake brownies.
- Make ahead: You can prepare the batter a few hours in advance and store it in the fridge. Let it come to room temperature before baking for even results.
Storage and Reheating Instructions
Knowing how to store and reheat your red velvet brownies will help maintain their flavor and texture for days—or even weeks.
Room Temperature Storage
Place brownies in an airtight container and store them at room temperature for up to three days. To prevent them from drying out, layer parchment paper between the slices and make sure the container is sealed tightly.
Refrigerator Storage
If you live in a warmer climate or want to keep them longer, store the brownies in the refrigerator. They’ll stay fresh for up to six days. Before serving, allow them to sit at room temperature for about 15 minutes to soften.
Freezing Instructions
Red velvet brownies freeze beautifully. Wrap individual squares in plastic wrap, then place them in a freezer-safe zip-top bag or container. They can be frozen for up to two months. To thaw, place the brownies in the fridge overnight or let them sit at room temperature for about an hour.
Reheating Tips
If you prefer a warm brownie, reheat a slice in the microwave for 10 to 15 seconds. Be careful not to overheat, as this can dry them out.
Frequently Asked Questions
What makes red velvet brownies different from regular brownies?
Red velvet brownies include cocoa, vinegar, and food coloring, creating a unique flavor profile that’s slightly tangy and not as intensely chocolatey as traditional brownies. The red color and white chocolate chips also set them apart visually and in taste.
Can I make red velvet brownies without food coloring?
Yes. While the color is part of the appeal, the flavor remains delicious without it. You can also use natural alternatives like beet powder for a subtle red tint.
Is vinegar necessary in red velvet brownies?
Yes. The vinegar enhances the cocoa flavor and interacts with the other ingredients to create the signature red velvet taste and texture.
Can I use a different type of chocolate chip?
Absolutely. Dark, milk, or semi-sweet chocolate chips all work. You can even substitute in nuts or candy pieces if preferred.
How do I know when the brownies are done?
Bake until the edges are set and a toothpick inserted into the center comes out with a few moist crumbs. Avoid waiting for a completely clean toothpick, as that may indicate overbaking.
Can I double the recipe?
Yes, this recipe can be doubled and baked in a 9×13-inch pan. You may need to increase the baking time by 5 to 8 minutes, but keep an eye on the texture for the best results.
What’s the best way to cut brownies cleanly?
Let the brownies cool fully, then use a plastic knife or a sharp non-serrated knife. Wipe the blade between each cut for the cleanest results.
Conclusion
With their rich cocoa flavor, striking red hue, and bursts of white chocolate, red velvet brownies are a standout dessert for any occasion. Whether served plain or dressed with toppings, they offer a unique and indulgent twist on a beloved classic. By following the tips, storage methods, and advice in this guide, you’ll be able to make a batch that stays fresh, flavorful, and visually stunning every time.
Looking for more decadent treats? Check out our collection of easy dessert recipes and holiday baking favorites to keep your dessert table full of crowd-pleasers.
Red Velvet Brownies
Ingredients
- 12 tablespoons unsalted butter melted
- 5 tablespoons unsweetened cocoa powder
- ½ teaspoon table salt
- 1¼ cups granulated sugar
- 3 eggs
- ¾ teaspoon vanilla extract
- ¾ teaspoon white vinegar
- 1 cup all-purpose flour
- 10 –12 drops Wilton red food coloring adjust to desired color
- 1 cup white chocolate chips divided
Instructions
- Preheat oven to 350°F (175°C). Line a 9×9-inch baking pan with parchment paper and spray with nonstick cooking spray.
- In a large bowl, whisk together melted butter, cocoa powder, salt, and sugar until fully combined.
- Add the eggs, vanilla extract, and vinegar. Mix until smooth.
- Gently fold in the flour. Before it is completely mixed, add 7 drops of red food coloring, adding more until the desired red color is reached.
- Fold in ½ cup of the white chocolate chips.
- Pour the batter into the prepared baking pan and smooth the top. Sprinkle the remaining ½ cup of white chocolate chips evenly over the top.
- Bake for 22–25 minutes, or until a toothpick inserted in the center comes out with a few moist crumbs.
- Allow the brownies to cool in the pan for at least 1 hour before slicing into squares and serving.
Leave a Comment