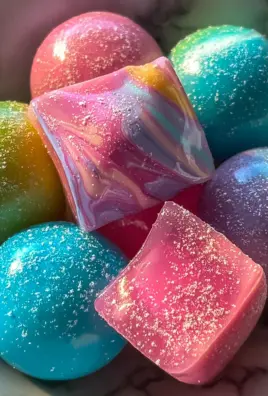
Jello Pudding Pops are a creamy, frozen dessert made from instant pudding and milk. They’re a nostalgic favorite from the 80s and 90s, bringing back memories of store-bought pudding pops now recreated easily at home. These homemade pops combine smooth chocolate and white chocolate (or vanilla) flavors, swirled together in every bite. With a simple no-bake method, they’re perfect for hot summer days, after-school snacks, or anytime you need a sweet, refreshing treat.

This recipe is ideal for both kids and adults. It’s easy to prepare, takes just a few ingredients, and doesn’t require any cooking. If you’re craving something creamy and cold with that rich pudding texture, these pops deliver every time.
Why You’ll Love This Recipe
- Made with just three ingredients and no artificial flavors
- Combines chocolate and white chocolate pudding for a rich, swirled look and taste
- Requires no baking or stove time
- Kid-friendly and perfect for parties, lunchbox treats, or desserts
- Uses instant pudding, making the process fast and foolproof
- Easily customizable with mix-ins or toppings
Whether you’re looking for a quick frozen treat or a nostalgic dessert, Jello Pudding Pops are a go-to recipe that’s easy to love and even easier to make.
Preparation Phase & Tools to Use
Before making your pudding pops, gather your tools and ingredients. The prep process is straightforward but having everything ready will help ensure smooth layering and swirling.
Essential Tools and Equipment
- Two medium mixing bowls – One for each pudding flavor
- Whisk – For smooth, lump-free pudding
- Measuring cups – To portion the milk accurately
- Gallon-size zip-top bag – Used as a piping bag to swirl the pudding
- Popsicle molds – To shape and freeze the pudding pops
- Scissors – To snip the corner of the bag for piping
Importance of Each Tool
Each tool plays a role in ensuring the pudding sets properly and swirls attractively in the mold.
- The whisk creates smooth pudding with no lumps.
- Mixing bowls help you keep flavors separate until you’re ready to combine.
- A zip-top bag makes swirling the pudding into molds much easier than using spoons.
- Popsicle molds ensure consistent shape and size for freezing.
- A quick snip with scissors turns your bag into a makeshift piping tool, giving you control over how the pudding enters the molds.
Preparation Tips
- Use whole milk to keep the pops creamy and rich. Skim or low-fat milk may result in an icier texture.
- Do not over-mix the pudding after it begins to thicken. Mix just until smooth and allow it to set slightly for better texture.
- Make sure the pudding is only partially set before piping to allow for clean, smooth swirls.
- Use a steady hand when piping the pudding into the molds to control the layering of each flavor.
- Freeze for at least 3 hours, but overnight is best for solid pops that release easily.
Ingredients
Here’s everything you need to make 12 Jello Pudding Pops:
- 1 (3.3 oz) box White Chocolate Instant Jell-O Pudding Mix
You can substitute vanilla instant pudding if preferred. - 1 (3.3 oz) box Chocolate Instant Jell-O Pudding Mix
- 3½ cups whole milk, divided evenly between both pudding mixes
This ingredient list keeps things simple but allows for a delicious combination of flavors.
Step-by-Step Directions
- In a medium bowl, whisk the white chocolate instant pudding mix with 1¾ cups of whole milk until smooth. Let it sit for a minute or two until it begins to thicken slightly.
- In a second medium bowl, whisk the chocolate instant pudding mix with the remaining 1¾ cups of whole milk. Again, allow it to thicken slightly.
- Once both puddings have started to set but are still pourable, spoon alternating scoops of each into a gallon-size zip-top bag.
- Seal the bag tightly and snip off one corner with scissors to create a piping tip.
- Pipe the pudding mixture into popsicle molds, allowing the two flavors to swirl together naturally.
- Tap the molds gently on the counter to eliminate air bubbles and ensure an even fill.
- Place the molds in the freezer and let them freeze for a minimum of 3 hours, preferably overnight.
- To remove the pudding pops, run the bottom of each mold under warm water for a few seconds. Gently pull the pops free.
Serving Suggestions
Jello Pudding Pops are incredibly versatile and can be served in a variety of fun, creative ways. Since these frozen desserts are rich, creamy, and layered with flavor, they stand on their own. However, enhancing the presentation and offering thoughtful pairings can elevate the experience.
Here are a few ways to serve them:
1. Classic Frozen Treat
Serve straight out of the freezer for a simple, satisfying dessert. This is ideal for summer days, backyard barbecues, or poolside snacks. Just pop them out of the mold and serve on a plate or napkin.
2. Dessert Platter Display
Include Jello Pudding Pops on a dessert board alongside other cool treats such as mini cupcakes, chocolate-dipped strawberries, and marshmallows. This is great for parties or events.
3. Dipped and Decorated
Before freezing completely, dip the tips in melted chocolate and sprinkle with crushed cookies, nuts, or shredded coconut. This adds texture and flair while maintaining the creamy base.
4. With Toppings on the Side
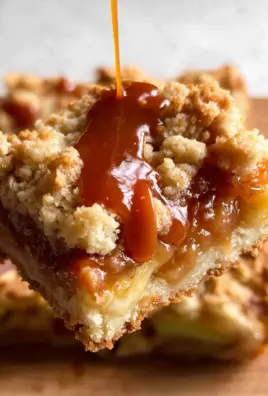
Offer optional toppings for dipping or sprinkling just before serving. Whipped cream, caramel drizzle, or mini chocolate chips all complement the rich pudding base without overpowering it.
5. On a Stick, but Upscaled
Slide the pudding pop onto a small serving plate with a drizzle of sauce and a dusting of cocoa powder. This method offers a more refined presentation suitable for adult guests or dinner parties.
Common Mistakes to Avoid
Even though Jello Pudding Pops are simple to make, a few common missteps can affect the texture, flavor, or final appearance. Here’s what to watch for and how to avoid it.
1. Using Low-Fat or Skim Milk
Whole milk is essential to achieving a creamy, smooth consistency. Using skim or reduced-fat milk may cause the pops to freeze with an icy texture instead of a soft, creamy bite.
2. Over-Setting the Pudding Before Swirling
If you let the pudding sit too long before transferring it into molds, it may thicken too much and become difficult to swirl. The goal is a pudding that’s slightly thick but still pliable.
3. Improper Swirling Technique
Spoon the pudding into a zip-top bag and pipe it into the molds in alternating layers. Avoid scooping directly into the molds, which can result in uneven swirls or air pockets.
4. Forcing Pops Out of the Mold
Trying to pull the pops out without warming the molds can cause them to break. Always run warm water over the outside of the mold for a few seconds to loosen them gently.
5. Not Freezing Long Enough
Allowing enough time for the pops to freeze completely is crucial. At least three hours is recommended, but overnight is ideal for firm texture and clean removal.
Best Side Dish Pairings
While Jello Pudding Pops are a dessert on their own, pairing them with complementary side dishes can create a well-rounded dessert table. Whether you’re serving them at a party, picnic, or casual get-together, here are eight excellent options.
1. Fresh Fruit Salad
A bowl of mixed berries, melon, and grapes offers a refreshing contrast to the rich pudding pops. The natural sweetness and juiciness of fresh fruit cleanse the palate between bites.
2. Mini Cheesecake Bites
These bite-sized treats pair well with pudding pops, offering a dense, tangy flavor that balances the creamy sweetness of the pops.
3. Coconut Macaroons
Light, chewy, and slightly tropical, coconut macaroons add texture and complement both the chocolate and vanilla components of the pops.
4. Chocolate-Covered Strawberries
These classic treats share the chocolate theme and bring a slight crunch, making them a great visual and flavor pairing.
5. Frozen Banana Bites
Sliced bananas dipped in chocolate and frozen provide a soft yet icy texture that aligns well with the creamy consistency of the pudding pops.
6. Lemon Shortbread Cookies
These buttery cookies add a citrusy brightness that contrasts nicely with the deep flavors of the pudding.
7. Whipped Cream with Crushed Nuts
Serve whipped cream in small cups with a sprinkle of crushed almonds or pistachios. This makes a rich but light dipper for your pudding pops.
8. Mint Iced Tea or Fresh Lemonade
If you want a drink pairing instead of food, a cool glass of mint iced tea or lemonade adds a refreshing finish to every bite.
Pro Tips for Perfect Jello Pudding Pops
Whether you’re making this recipe for the first time or fine-tuning your frozen treat game, the following tips will help you achieve the best results every time.
Use Whole Milk
For a creamy, smooth texture, whole milk is the best option. It freezes into a soft, satisfying consistency, unlike low-fat or non-dairy milk which can turn icy or thin.
Don’t Overmix
Once the pudding begins to set, avoid overmixing. Stir just enough to combine the mix and milk. Overmixing can break down the structure and make it harder to swirl the flavors properly.
Create a Homemade Piping Bag
Transferring the pudding into a zip-top bag with a snipped corner allows you to pipe the mixture smoothly into the molds. This method gives better swirl control and prevents mess.
Freeze Overnight
While the pudding pops can be ready in as little as three hours, freezing them overnight results in a firmer texture and easier removal from the molds.
Add Layers or Mix-ins
You can make layered pops by filling the mold halfway with one flavor and topping it with another. For extra texture, stir in mini chocolate chips, cookie crumbs, or crushed nuts before piping.
Storage and Reheating Instructions
Although Jello Pudding Pops are best enjoyed fresh from the freezer, proper storage ensures they stay delicious for weeks.
How to Store
- Keep pops in the original molds with sticks inserted until you’re ready to serve.
- For longer storage, once fully frozen, remove them from the molds and wrap each pop individually in wax paper or plastic wrap.
- Store the wrapped pops in a sealed freezer-safe container or zip-top bag.
Freezer Shelf Life
Jello Pudding Pops can be stored for up to 2 months. After this point, the texture may begin to change, and freezer burn could affect flavor.
Can You Reheat Pudding Pops?
No reheating is needed—or recommended. These are frozen desserts and should be consumed directly from the freezer. Thawing them results in a soft, melted pudding texture rather than a firm, icy pop.
Frequently Asked Questions
Can I use a non-dairy milk alternative?
Yes, but results may vary. Oat milk and almond milk work better than rice or soy milk. However, the pops may not be as creamy as those made with whole milk.
Are Jello Pudding Pops gluten-free?
Most instant pudding mixes are gluten-free, but always check the label. Also ensure that your added ingredients, such as toppings or mix-ins, are certified gluten-free.
What’s the best way to remove pudding pops from the mold?
Run the mold under warm water for 10 to 15 seconds. Gently pull on the stick and the pop should release without breaking. Avoid twisting or yanking forcefully.
Can I use cook-and-serve pudding?
No. This recipe specifically calls for instant pudding mix, which sets quickly without heat. Cook-and-serve pudding requires stovetop preparation and may not freeze with the right texture.
Can I make these with other flavors?
Absolutely. Try butterscotch, banana cream, or pistachio instant pudding for a twist. You can even layer multiple flavors for a rainbow-style pop.
How many pops does this recipe make?
This recipe yields about 12 standard-sized pops, depending on the size of your molds. Adjust ingredient quantities proportionally if using mini or jumbo molds.
Conclusion
Jello Pudding Pops are more than just a dessert—they’re a nostalgic reminder of childhood summers and classic frozen treats. With just three ingredients, no cooking, and endless variations, they offer a perfect mix of ease and indulgence. Whether you’re entertaining guests, making snacks for kids, or simply craving a cool bite, these pudding pops deliver smooth, creamy satisfaction every time.
They’re simple to prepare, easy to customize, and make-ahead friendly. Plus, they store beautifully, allowing you to enjoy a ready-to-go frozen treat whenever the craving strikes.
For more no-bake desserts, be sure to check out our No-Bake Strawberry Cheesecake Cups or this Easy Frozen Yogurt Bark.

Jello Pudding Pops
Ingredients
- 1 3.3 oz box White Chocolate Instant Jell-O Pudding Mix (or vanilla)
- 1 3.3 oz box Chocolate Instant Jell-O Pudding Mix
- 3½ cups whole milk divided
Instructions
- In one medium bowl, whisk together the white chocolate pudding mix with 1¾ cups of milk until smooth. Let it thicken slightly.
- In another medium bowl, whisk together the chocolate pudding mix with the remaining 1¾ cups of milk. Let it thicken slightly as well.
- Once both puddings are beginning to set, spoon alternating scoops of each pudding into a gallon-size zip-top bag. Seal the bag and snip one of the corners.
- Pipe the pudding mixture into popsicle molds, allowing the two flavors to swirl together as you fill them.
- Freeze for at least 3 hours, or overnight for best results.
- To remove the pudding pops from the molds, dip the bottoms of the molds in hot water for a few seconds until the pops slide out easily.

Leave a Comment