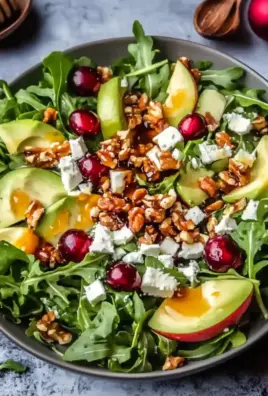
Homemade Honey Buns are the ultimate indulgence for breakfast or a mid-day treat. They feature a soft, melt-in-your-mouth dough infused with the perfect balance of honey and vanilla. The cinnamon sugar swirl adds warmth, while the sticky glaze gives them their iconic sweetness. Whether served warm or enjoyed the next day, these buns are a nostalgic delight that outshines their store-bought counterparts.

Why You’ll Love This Recipe
- Simple Ingredients: Uses pantry staples for maximum flavor.
- Customizable: Add extra spices or a drizzle of chocolate for a unique twist.
- Make-Ahead Friendly: Prep the dough in advance for less work on baking day.
- Perfect for All Occasions: Great for brunches, holidays, or a sweet weekend treat.
Preparation Phase
Essential Tools and Equipment
To ensure the best results, gather these tools before starting:
- Stand mixer: For effortless kneading.
- Whisk attachment and dough hook: For mixing and developing the dough.
- Mixing bowls: Use multiple sizes for convenience.
- Rolling pin: For shaping the dough evenly.
- Knife or bench scraper: To cut uniform rolls.
- Parchment paper: Keeps buns from sticking during the rise.
- Large pan or stockpot: For frying the buns.
- Wire cooling rack: Allows buns to cool without becoming soggy.
- Kitchen thermometer: Ensures oil stays at the perfect frying temperature of 365°F.
Preparation Tips for Success
- Activate Your Yeast:
Use warm water between 105°F and 110°F. If it’s too hot, it will kill the yeast; too cold, and the dough won’t rise properly. - Knead for the Right Texture:
The dough should be soft and slightly sticky but stretchable without breaking. Kneading for 8 minutes in a stand mixer ensures proper gluten development. - Allow Ample Rising Time:
Let the dough double in size for the fluffiest buns. Use a warm, draft-free space for optimal rising conditions. - Use Fresh Oil for Frying:
For best flavor and texture, always fry in clean, fresh vegetable oil.
Ingredients for Success
For the Dough:
- ½ cup warm water (105°F-110°F)
- 3 tablespoons granulated sugar (divided)
- 1 tablespoon active yeast
- 2 ⅔ cups all-purpose flour (measured correctly for accuracy)
- ⅓ cup honey (mild-flavored, like clover or wildflower)
- ¼ cup melted shortening (preferred for bakery-style softness)
- 3 large egg yolks (adds richness)
- 1 teaspoon vanilla extract
- ½ teaspoon salt
- Vegetable oil (for frying)
For the Cinnamon Sugar:
- ¼ cup granulated sugar
- 1 ½ teaspoons cinnamon
For the Glaze:
- 4 ⅔ cups powdered sugar (sifted for smoothness)
- 2 ½ tablespoons honey
- 1 tablespoon melted butter
- ½ teaspoon vanilla extract
- ¼ teaspoon salt
- Warm water (to thin glaze to desired consistency)
Step-by-Step Directions
- Activate the Yeast
- In the bowl of a stand mixer, combine warm water, 2 teaspoons of sugar, and yeast. Whisk lightly.
- Let sit for 5 minutes until the mixture turns frothy. This ensures the yeast is active.
- Mix the Dough
- Attach the dough hook to the mixer. Add the remaining sugar, flour, honey, melted shortening, egg yolks, vanilla, and salt.
- Knead on medium speed for 8 minutes. The dough should be sticky but elastic enough to stretch thin without breaking.
- First Rise
- Lightly spray a mixing bowl with baking spray. Transfer the dough into the bowl, cover with plastic wrap or a clean towel, and let rise in a warm area for 1 hour or until doubled in size.
- Prepare the Cinnamon Sugar
- In a small bowl, whisk together the granulated sugar and cinnamon.
- Shape the Dough
- Turn the risen dough onto a lightly floured surface. Roll it into a rectangle approximately 12” long and 8” wide.
- Sprinkle the cinnamon sugar mixture evenly over the surface, pressing it gently into the dough.
- Roll and Cut
- Roll the dough tightly from the long edge to create a log. Turn the log diagonally and score it into eight equal sections (1-inch each). Trim the ends for uniformity.
- Cut the pieces along the score marks and place them on a parchment-lined baking sheet, leaving at least 2 inches between each.
- Second Rise
- Lightly press each bun into an oblong shape using your fingers. Cover with a towel and let rise for about 45 minutes until puffy but not doubled.
- Heat the Oil
- Pour vegetable oil into a large pan or stockpot. Heat to 365°F, monitoring with a thermometer for accuracy.
- Fry the Honey Buns
- Gently press each bun down before adding to the hot oil. Fry in batches to avoid overcrowding, cooking each side for 90 seconds until golden brown.
- Remove buns and place them on a wire rack over a paper towel-lined tray to drain excess oil.
- Prepare the Glaze
- In a medium bowl, whisk together powdered sugar, honey, melted butter, vanilla, and salt. Gradually add warm water, 1 tablespoon at a time, until the glaze reaches a smooth, pourable consistency.
- Glaze the Buns
- While the buns are still warm, dip each one into the glaze, ensuring even coverage. Allow excess glaze to drip back into the bowl, then place buns on the wire rack to set.
- Serve and Enjoy
- Serve warm or at room temperature. For the best experience, enjoy with a cup of coffee or tea!
Pro Tip
Store leftover honey buns in an airtight container for up to 5 days. Reheat in the microwave for 10 seconds to restore their warm, gooey texture.
Serving Suggestions
Homemade Honey Buns are versatile and pair well with a variety of side dishes, drinks, and accompaniments. Here are some ideas to elevate your serving experience:
- Morning Delight: Pair with a cup of freshly brewed coffee or a chai latte.
- Sweet and Savory Combo: Serve alongside crisp, smoky bacon or savory breakfast sausage.
- Holiday Brunch Favorite: Include as part of a festive spread with scrambled eggs and fresh fruit.
Common Mistakes to Avoid & How to Perfect the Recipe
1. Yeast Troubles:
- Problem: Dough doesn’t rise properly.
- Solution: Use fresh yeast and ensure the water temperature is between 105°F and 110°F.
2. Overworking the Dough:
- Problem: Dense, tough buns.
- Solution: Knead only until the dough becomes soft, smooth, and elastic (8 minutes in a stand mixer).
3. Incorrect Oil Temperature:
- Problem: Buns are greasy or burnt.
- Solution: Maintain the oil at 365°F using a thermometer and fry in small batches.
4. Uneven Glaze Coverage:
- Problem: Glaze doesn’t stick or pools unevenly.
- Solution: Dip the buns while they’re still warm, ensuring an even coat.
5. Skipping the Flattening Steps:
- Problem: Rolls come out overly fluffy instead of dense and chewy.
- Solution: Flatten buns during shaping and after the second rise to create the signature honey bun texture.
Side Dish Recommendations
Pairing Homemade Honey Buns with the right sides can elevate them into a complete meal. Here are eight delicious side dish ideas:
1. Fresh Fruit Salad
A medley of fresh berries, oranges, and melons adds a refreshing contrast to the buns’ sweetness. Drizzle with a light honey-lemon dressing for added flavor.
2. Maple-Glazed Bacon
Crispy strips of bacon coated in a maple glaze enhance the buns’ honey notes with savory, smoky undertones.
3. Scrambled Eggs with Chives
Fluffy eggs sprinkled with fresh chives balance the richness of the buns with a touch of savoriness.
4. Yogurt Parfait with Honey and Granola
Layer Greek yogurt with a drizzle of honey, crunchy granola, and fresh berries for a light, complementary side.
5. Whipped Cinnamon Butter
Serve a dollop of spiced whipped butter alongside for a creamy, indulgent spread.
6. Spiced Apple Compote
Warm, spiced apples cooked with cinnamon and nutmeg provide a cozy, fall-inspired side to complement the honey buns.
7. Homemade Berry Jam
Offer a small jar of homemade raspberry or strawberry jam to spread over the buns for extra fruity sweetness.
8. Toasted Coconut Chips
Crispy coconut chips add a tropical crunch that pairs beautifully with the sticky honey glaze.
Elevating the Experience
Whether you’re enjoying these buns as a standalone indulgence or making them the centerpiece of a decadent breakfast spread, the sides and tips above will make every bite unforgettable. Combine sweet and savory elements for the perfect balance, and don’t forget to serve them warm for the ultimate melt-in-your-mouth experience!
Recipe Tips, Storage, and FAQs
Recipe Tips for Success
1. Flatten the Buns at Key Stages
Flattening the buns before and after the second rise ensures the characteristic dense yet soft texture that sets honey buns apart from fluffy cinnamon rolls.
2. Use Fresh Ingredients
- Yeast: Always check the expiration date to ensure proper activation.
- Honey: Use a mild, high-quality honey for a balanced sweetness.
- Shortening or Butter: Shortening provides a classic bakery-style texture, but melted butter works as a flavorful substitute.
3. Achieve the Perfect Glaze
The glaze should be thin enough to coat the buns smoothly but thick enough to set into a sticky, glossy finish. Adjust with warm water a tablespoon at a time.
4. Make Ahead for Convenience
- Dough: Prepare the dough and refrigerate overnight for a longer fermentation process, which enhances flavor.
- Glaze: Make the glaze in advance and store in an airtight container; re-whisk before using.
Storage and Reheating
Short-Term Storage
- Store honey buns in an airtight container or resealable bag at room temperature for up to 5 days.
- To refresh, microwave for 10 seconds or warm in a low oven for 5 minutes.
Freezing Honey Buns
- Wrap each bun tightly in plastic wrap and store in a freezer-safe bag for up to 3 months.
- To serve, thaw at room temperature and warm in the microwave for a freshly baked taste.
Pro Tip: Freeze without glaze for better texture; add the glaze after reheating.
Frequently Asked Questions (FAQs)
Q: Can I bake these buns instead of frying them?
A: Yes! Preheat your oven to 375°F and bake the shaped buns on a parchment-lined baking sheet for 15-18 minutes or until golden brown. Dip in glaze immediately after baking for a sticky finish.
Q: Can I make these without a stand mixer?
A: Absolutely! Mix the dough with a wooden spoon and knead by hand for 10-12 minutes until smooth and elastic.
Q: What oil is best for frying?
A: Use a neutral oil with a high smoke point, like vegetable, canola, or peanut oil.
Q: My glaze isn’t sticking—what went wrong?
A: Glaze adheres best to warm honey buns. Dip the buns immediately after frying while they’re still slightly hot.
Q: Can I substitute butter for shortening in the dough?
A: Yes, but shortening gives the buns a lighter, more tender texture. Melted butter will work if you prefer its flavor.
Q: Why did my dough turn out too sticky to handle?
A: Sticky dough is normal for honey buns, but if it’s unmanageable, add a tablespoon of flour at a time until it’s easier to work with. Avoid over-flouring, as this can make the buns dense.
Conclusion: Perfecting Homemade Honey Buns
Mastering Homemade Honey Buns at home is a rewarding experience that brings bakery-quality results to your kitchen. With their golden, sticky glaze and soft, cinnamon-swirled interior, these buns are a labor of love that’s worth every step.
Ready to bake your own batch of sweet, soft perfection? Follow this recipe to create a treat that’s perfect for breakfast, brunch, or dessert. If you loved these buns, explore more sweet recipes on our homemade baking collection or try our easy cinnamon rolls.
Happy baking, and don’t forget to share your creations with us!

Leave a Comment