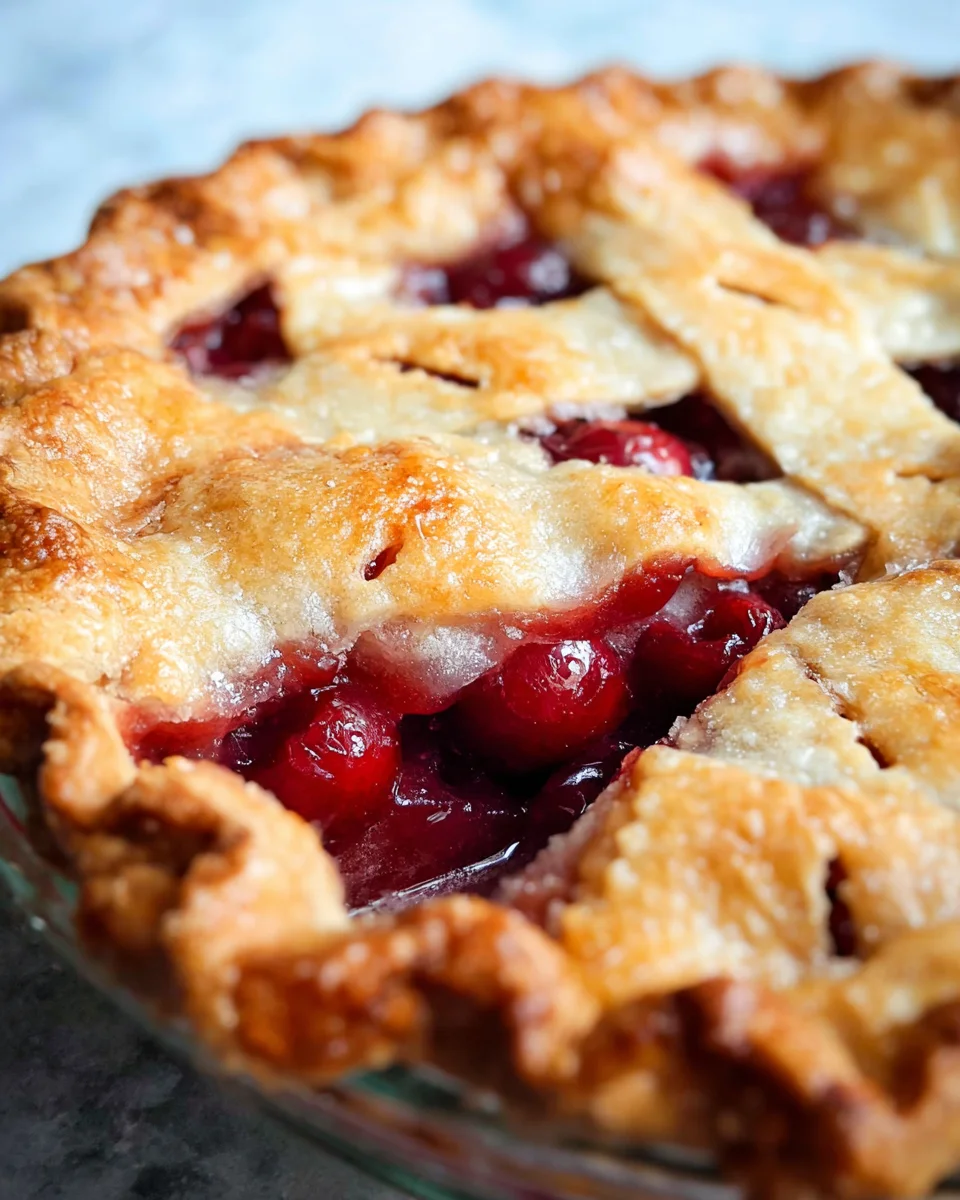
Fresh Cherry Pie is a delightful summer dessert that captures the essence of the season. Made with ripe, juicy cherries, this pie boasts a flaky crust and a sweet filling that’s perfect for picnics, barbecues, or family gatherings. Its vibrant color and rich flavor make it a showstopper at any occasion. Whether you’re serving it warm with ice cream or chilled on its own, Fresh Cherry Pie is sure to impress.

Why You’ll Love This Recipe
- Easy to Make: With simple ingredients and straightforward steps, this pie is beginner-friendly.
- Delicious Flavor: The combination of fresh cherries and vanilla creates a mouthwatering filling that bursts with flavor.
- Versatile Dessert: Enjoy it warm, cold, or topped with whipped cream—perfect for any occasion.
- Perfect for Summer: Celebrate cherry season by showcasing fresh cherries in this classic dessert.
- Impressive Presentation: The double-crust design makes for an eye-catching centerpiece on your dessert table.
Tools and Preparation
Before diving into the recipe, gather your tools and equipment to ensure a smooth baking experience.
Essential Tools and Equipment
- 9-inch pie plate
- Mixing bowls
- Pastry blender or knives
- Rolling pin
- Saucepan
- Wire rack
Importance of Each Tool
- 9-inch pie plate: Provides the right size for even baking and presentation.
- Pastry blender or knives: Essential for achieving that perfect crumbly texture in the crust.
- Rolling pin: Helps roll out the dough evenly for a uniform crust.
Ingredients
A stunning double-crusted cherry pie using fresh cherries for a show-stopping summer dessert!
Ingredients:
– 6 cups fresh cherries, pitted
– 1 tablespoon fresh lemon juice
– 1/2 teaspoon vanilla extract
– 3/4 cup granulated sugar
– 1/4 cup cornstarch
– pinch of salt
– 2 and 1/2 cups all-purpose flour
– 1/2 cup granulated sugar
– 1 cup (2 sticks) unsalted butter, cold & cubed
– 1/4 cup cold water
– 1 large egg
– 1 tablespoon water
– 1 tablespoon granulated sugar
How to Make Fresh Cherry Pie
Step 1: Prepare the Cherry Filling
In a saucepan over medium heat, add the pitted cherries, lemon juice, vanilla extract, granulated sugar, cornstarch, and salt. Bring the mixture to a simmer. Reduce heat to low and let it simmer while stirring frequently for about 10 minutes until thickened. Remove from heat and let cool.
Step 2: Preheat the Oven
Preheat your oven to 425°F (220°C). Generously butter a 9-inch pie plate and set it aside.
Step 3: Make the Pie Crust
In a large bowl, whisk together the flour and sugar. Cut in the cold butter using a pastry blender or two knives until the mixture resembles coarse crumbs. Add the cold water gradually and knead with your hands until well combined. Divide the dough into two equal balls.
Step 4: Chill the Dough
Flatten each ball of dough slightly and wrap them in plastic wrap. Place them into the refrigerator for about 30 minutes to chill.
Step 5: Roll Out Dough
Remove the dough from the refrigerator. On a lightly floured surface with a floured rolling pin, roll each ball into discs about an inch larger than your pie plate. Aim for about 1/8-inch thickness.
Step 6: Assemble the Pie Crusts
Transfer one rolled-out disc to your buttered pie plate by rolling it around your rolling pin first. Press down gently so it fits snugly in the plate. Let excess dough hang over the edges.
Step 7: Fill with Cherry Mixture
Spoon the cooled cherry filling into your prepared crust evenly.
Step 8: Top with Second Crust
Roll out the second ball of dough to match its size with the first disc. Place it over the cherry filling in your pie plate. Trim excess dough around the rim and seal both crusts together by crimping or pressing firmly along edges. Cut six small slits in a circle pattern in the top crust for steam release.
Step 9: Prepare Egg Wash
In a small bowl, whisk together one egg with one tablespoon of water. Brush this mixture over both top edges of your pie crusts. Sprinkle additional granulated sugar over top for sweetness.
Step 10: Bake Your Pie
Place your assembled pie on a rimmed baking sheet and bake it for approximately 30 minutes, rotating halfway through cooking time. After this initial bake, remove from oven; cover edges loosely with foil to avoid burning them while continuing to bake for another 30 minutes or until golden brown on top.
Step 11: Cool & Serve
Once baked perfectly, take out your Fresh Cherry Pie from oven; remove foil from edges carefully! Allow cooling on wire rack for at least two hours before slicing into wedges—this waiting period enhances flavors!
Now you have an irresistible Fresh Cherry Pie ready to enjoy!
How to Serve Fresh Cherry Pie
Fresh Cherry Pie is a delightful dessert that can be enjoyed in many ways. Whether you’re hosting a summer gathering or enjoying a quiet evening at home, serving this pie with the right accompaniments can enhance its flavors.
A La Mode
- Vanilla Ice Cream: The creaminess of vanilla ice cream perfectly balances the tartness of the cherries.
- Whipped Cream: A dollop of freshly whipped cream adds a light and airy touch to each slice.
- Chocolate Sauce: Drizzling chocolate sauce over the pie can create an indulgent twist.
With Beverages
- Iced Tea: Sweetened or unsweetened iced tea pairs well with the pie’s sweet flavors.
- Sparkling Water: A refreshing sparkling water helps cleanse your palate between bites.
- Coffee: A warm cup of coffee complements the cherry pie beautifully, enhancing its rich taste.
For Special Occasions
- Garnished with Mint Leaves: Adding fresh mint leaves not only looks beautiful but also adds a refreshing note.
- Serving on a Decorative Plate: Presenting your cherry pie on a lovely plate makes it visually appealing for guests.
How to Perfect Fresh Cherry Pie
Creating the perfect Fresh Cherry Pie is an art that combines technique with quality ingredients. Here are some tips to ensure your pie is a showstopper.
- Use Fresh Cherries: Always opt for ripe, fresh cherries for the best flavor and texture in your filling.
- Let Filling Cool: Allowing your cherry filling to cool before assembling prevents a soggy crust.
- Chill Your Dough: Keeping your dough cold ensures a flaky crust that bakes up beautifully.
- Make Slits in the Top Crust: This allows steam to escape while baking, preventing overflow and ensuring even cooking.
- Rotate During Baking: Rotating the pie halfway through baking helps achieve an evenly golden crust.
- Cool Before Slicing: Letting the pie cool completely helps set the filling, making it easier to slice.
Best Side Dishes for Fresh Cherry Pie
Fresh Cherry Pie can be complemented by various side dishes that enhance its flavors and make for a well-rounded meal. Here are some great options:
- Salad with Feta Cheese: A light salad featuring feta adds a savory contrast to the sweet pie.
- Grilled Chicken Skewers: Marinated chicken skewers offer a hearty addition that balances the meal nicely.
- Roasted Vegetables: Seasonal roasted vegetables provide earthy flavors that pair well with dessert.
- Cheese Platter: An assortment of cheeses can serve as an excellent starter before indulging in dessert.
- Fruit Salad: A refreshing fruit salad made with seasonal fruits complements the cherry flavor without overpowering it.
- Bread Rolls: Soft bread rolls are perfect for soaking up any excess juices from the cherry filling.
Common Mistakes to Avoid
Making a fresh cherry pie can be simple, but there are common pitfalls to watch out for. Here are some mistakes and how to avoid them.
- Using unripe cherries: Unripe or sour cherries can ruin the flavor of your pie. Always choose ripe, sweet cherries for the best results.
- Skipping the chilling step: Not chilling the dough can lead to a tough crust. Be sure to refrigerate your dough for at least 30 minutes before rolling it out.
- Overfilling the pie: Adding too much filling can cause spills and a soggy bottom. Stick to the recommended amount of cherry filling for a perfect balance.
- Not venting the top crust: Failing to cut slits in the top crust can trap steam and make your pie soggy. Always make small slits to allow steam to escape.
- Neglecting to check oven temperature: An incorrect oven temperature can affect baking time and texture. Use an oven thermometer for accuracy.
Refrigerator Storage
- Store your fresh cherry pie in an airtight container.
- It will last up to 3 days in the refrigerator.
- Place parchment paper between slices if stacking.
Freezing Fresh Cherry Pie
- Wrap the pie tightly in plastic wrap or aluminum foil.
- It can be frozen for up to 3 months.
- For best results, freeze before baking.
Reheating Fresh Cherry Pie
- Oven: Preheat to 350°F and heat for about 15-20 minutes until warmed through.
- Microwave: Heat individual slices on medium power for 30-60 seconds.
- Stovetop: Place slices in a skillet over low heat, covering with a lid for about 5-10 minutes.
Frequently Asked Questions
How do I know when my Fresh Cherry Pie is done?
Your fresh cherry pie is done when the crust is golden brown, and you see bubbles in the filling through the slits.
Can I use frozen cherries for Fresh Cherry Pie?
Yes, you can use frozen cherries. Just make sure to thaw and drain any excess liquid before using them in your pie.
What should I serve with Fresh Cherry Pie?
Fresh cherry pie pairs well with vanilla ice cream or whipped cream for added sweetness.
How do I prevent my pie crust from getting soggy?
To prevent a soggy crust, bake it blind (without filling) for 10 minutes before adding the cherry mixture.
Can I customize my Fresh Cherry Pie recipe?
Absolutely! You can add spices like cinnamon or nutmeg, or even mix in other fruits like blueberries or raspberries for a unique twist.
Final Thoughts
This fresh cherry pie is not only a stunning dessert but also versatile enough for any occasion. Its flaky crust and sweet filling make it irresistible. Feel free to customize it with different spices or fruit combinations. Don’t hesitate—try making this delightful pie today!

Fresh Cherry Pie
- Total Time: 1 hour 30 minutes
- Yield: Serves 8
Description
Fresh Cherry Pie is the quintessential summer dessert that showcases ripe, juicy cherries enveloped in a flaky crust. This classic recipe is not only visually stunning with its vibrant colors but also incredibly flavorful, making it an ideal treat for picnics, barbecues, and family gatherings. The combination of sweet cherries and a touch of vanilla creates a delicious filling that pairs beautifully with a scoop of vanilla ice cream or a dollop of whipped cream. Whether served warm or chilled, this delightful pie is sure to impress everyone at your table.
Ingredients
- 6 cups fresh cherries, pitted
- 1 tablespoon fresh lemon juice
- 1/2 teaspoon vanilla extract
- 3/4 cup granulated sugar (for filling)
- 1/4 cup cornstarch
- pinch of salt
- 2 and 1/2 cups all-purpose flour
- 1/2 cup granulated sugar (for crust)
- 1 cup unsalted butter, cold & cubed
- 1/4 cup cold water
- 1 large egg (for egg wash)
- 1 tablespoon water
- 1 tablespoon granulated sugar (for topping)
Instructions
- In a saucepan over medium heat, combine cherries, lemon juice, vanilla extract, sugar, cornstarch, and salt. Simmer until thickened (about 10 minutes). Let cool.
- Preheat oven to 425°F (220°C) and butter a 9-inch pie plate.
- In a bowl, mix flour and sugar; cut in butter until crumbly. Add water gradually; knead into dough, divide into two balls and chill for 30 minutes.
- Roll out dough on a floured surface to fit the pie plate. Place one disc in the bottom of the plate.
- Fill with cherry mixture, cover with the second rolled-out disc, crimp edges to seal, and cut slits for steam release.
- Brush with egg wash and sprinkle sugar on top. Bake for about 60 minutes or until golden brown.
- Prep Time: 30 minutes
- Cook Time: 60 minutes
- Category: Dessert
- Method: Baking
- Cuisine: American
Nutrition
- Serving Size: 1 slice (138g)
- Calories: 280
- Sugar: 24g
- Sodium: 100mg
- Fat: 14g
- Saturated Fat: 8g
- Unsaturated Fat: 5g
- Trans Fat: 0g
- Carbohydrates: 36g
- Fiber: 2g
- Protein: 3g
- Cholesterol: 30mg


Leave a Comment