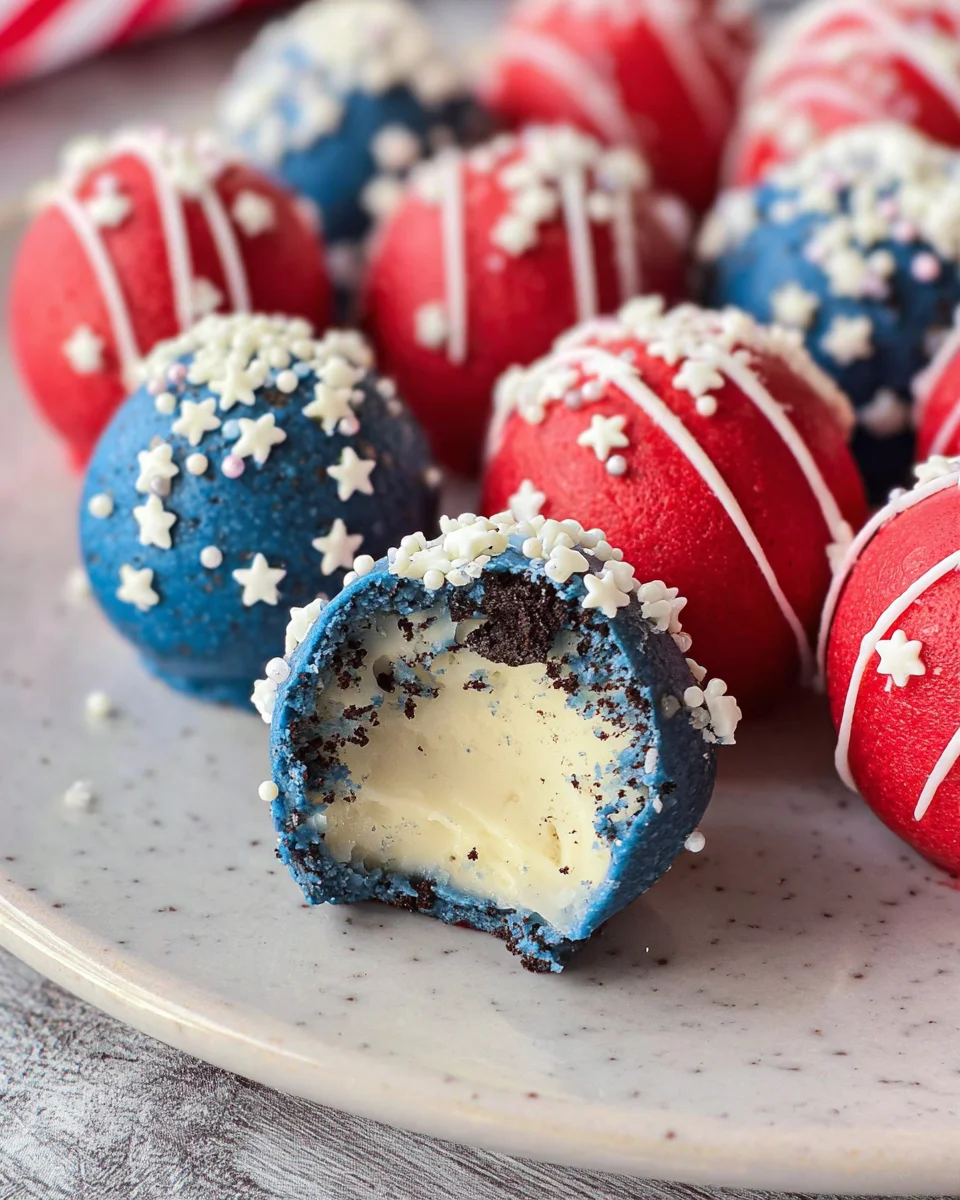
These 4th of July Oreo balls are the ultimate patriotic dessert for your summer celebrations! With their vibrant red, white, and blue colors, they not only look stunning but also taste delicious. Perfect for barbecues, picnics, or family gatherings, these no-bake treats offer a delightful combination of Oreo cookie flavor and creamy cheesecake richness. Easy to make and fun to decorate, they stand out as a festive centerpiece for Independence Day festivities.

Why You’ll Love This Recipe
- Quick and Easy: These Oreo balls require minimal effort with no baking involved. Just mix, roll, and chill!
- Festive Appearance: The bright colors and star sprinkles make these treats visually appealing for any 4th of July celebration.
- Versatile Flavor: Enjoy the classic taste of Oreos paired with creamy filling that everyone loves.
- Perfect for Sharing: Each batch yields about 30 servings, making them ideal for parties or family gatherings.
- Kid-Friendly: This recipe is great for involving children in the kitchen; they’ll love rolling the balls and decorating them!
Tools and Preparation
Before you dive into making your 4th of July Oreo balls, gather your tools to ensure a smooth process.
Essential Tools and Equipment
- Food processor
- Mixing bowl
- Baking sheet
- Parchment paper
- Microwave-safe bowls
Importance of Each Tool
- Food processor: Makes crushing the Oreos quick and effortless, ensuring a fine crumb texture.
- Mixing bowl: A large bowl is essential for combining ingredients without spills.
- Parchment paper: Prevents sticking when cooling your Oreo balls on the baking sheet.
Ingredients
For the Base
- 1 lb Oreo Cookies (2.12 oz Family Size package)
- 8 ounces Cream cheese (softened to room temperature)
For the Coating
- 12 ounces Blue candy melts
- 12 ounces Red candy melts
- ⅓ cup White melting wafers
For Decoration
- White star confetti sprinkles for topping
How to Make 4th Of July Oreo Balls
Step 1: Prepare the Oreo Mixture
- In a food processor, crush the Oreo cookies until they reach a fine crumb consistency.
- In a mixing bowl, combine the crushed Oreos with softened cream cheese. Mix until fully blended.
Step 2: Roll into Balls
- Use your hands to form small balls from the mixture, about 1 inch in diameter.
- Place each ball on a baking sheet lined with parchment paper.
Step 3: Chill the Balls
- Cover the baking sheet with plastic wrap and refrigerate for at least 60 minutes until firm.
Step 4: Melt the Candy Coatings
- In separate microwave-safe bowls, melt the blue candy melts, red candy melts, and white melting wafers. Heat in intervals of 30 seconds until smooth.
Step 5: Dip the Balls
- Remove chilled balls from the refrigerator.
- Dip each ball into one of the melted coatings using forks or spoons. Allow excess coating to drip off before placing back onto parchment paper.
Step 6: Add Decorations
- While still wet, sprinkle white star confetti on top of each ball for a festive touch.
- Repeat this process with all colored coatings until each ball is decorated.
Step 7: Final Chill and Serve
- Once all Oreo balls are coated and decorated, return them to the refrigerator for an additional hour to set completely.
- Serve chilled at your next summer gathering!
How to Serve 4th Of July Oreo Balls
These 4th of July Oreo balls make a delightful addition to any summer gathering. Their patriotic colors and fun flavors will surely impress your guests. Here are some creative ways to serve them!
On a Festive Platter
- Arrange the Oreo balls on a red, white, and blue platter for an eye-catching display.
- Use star-shaped serving dishes for added flair.
As Party Favors
- Wrap individual Oreo balls in clear cellophane bags tied with red, white, and blue ribbons.
- These make great take-home treats for your guests.
With Ice Cream
- Serve the Oreo balls alongside vanilla or strawberry ice cream for a delicious dessert combo.
- This pairing adds creaminess that complements the rich flavors of the Oreo balls.
At a Dessert Bar
- Set up a dessert bar where guests can create their own servings with toppings like whipped cream or fresh berries.
- Include small cups for serving the Oreo balls alongside other sweet treats.
How to Perfect 4th Of July Oreo Balls
To ensure your 4th of July Oreo balls turn out perfectly every time, consider these helpful tips.
- Use softened cream cheese: This makes it easier to mix and creates a smooth texture in your Oreo mixture.
- Crush Oreos finely: For best results, crush the cookies into fine crumbs. This helps them bind better when mixed with cream cheese.
- Chill before dipping: Refrigerate the formed balls before dipping them in candy melts. This helps maintain their shape during coating.
- Experiment with colors: Feel free to use different colored candy melts or sprinkles to match your holiday theme!
Best Side Dishes for 4th Of July Oreo Balls
Complement your festive dessert with some tasty side dishes that celebrate the spirit of Independence Day. Here are some excellent options!
- Patriotic Fruit Salad: A mix of strawberries, blueberries, and bananas tossed with a hint of lime juice makes for a refreshing side.
- Grilled Corn on the Cob: Sweet corn grilled to perfection and brushed with butter offers a classic summer flavor.
- Coleslaw: A creamy coleslaw provides crunch and contrast to the sweetness of the Oreo balls.
- Caprese Skewers: Cherry tomatoes, mozzarella balls, and basil drizzled with balsamic glaze create an elegant appetizer.
- Deviled Eggs: Classic deviled eggs garnished with paprika add a savory touch to your dessert spread.
- Potato Salad: A hearty potato salad dressed in mayo pairs well with sweet treats like Oreo balls.
Common Mistakes to Avoid
Making 4th of July Oreo balls can be a breeze, but some common mistakes can lead to less-than-stellar results. Here are a few tips to help you avoid those pitfalls.
- Skipping the cream cheese softening: If your cream cheese is not softened, it will be hard to mix with the Oreos. Take it out of the fridge at least 30 minutes before you start.
- Over-melting the candy melts: Overheating can cause the candy melts to seize. Melt them in short intervals and stir until smooth.
- Not chilling enough: Failing to chill your Oreo balls before coating them can lead to a messy dipping process. Chill them for at least 30 minutes before coating.
- Using uncoated Oreos: Make sure to use regular Oreos for the best flavor and texture. Other cookies may not provide the same taste or structure.
- Skipping decorations: Don’t forget the fun toppings like star confetti sprinkles! They make your dessert more festive and appealing.
Storage & Reheating Instructions
Refrigerator Storage
- Store 4th of July Oreo balls in an airtight container.
- They will stay fresh for about 1 week in the refrigerator.
Freezing 4th Of July Oreo Balls
- Place them in a single layer on a baking sheet before freezing.
- Once frozen, transfer them to a freezer-safe container or bag.
- They can last up to 3 months in the freezer.
Reheating 4th Of July Oreo Balls
- Oven: Preheat to 350°F (175°C). Place on a baking sheet for about 5-10 minutes, keeping an eye on them.
- Microwave: Heat for about 15-20 seconds at a time until warm, but be careful not to melt them too much.
- Stovetop: Use a double boiler on low heat, stirring gently until warm.
Frequently Asked Questions
Here are some common questions about making 4th of July Oreo balls.
Can I use different flavors of Oreos?
Yes! You can experiment with various Oreo flavors like mint or peanut butter for unique twists on your dessert.
How do I make these dairy-free?
To make dairy-free 4th Of July Oreo balls, substitute cream cheese with dairy-free cream cheese and use vegan chocolate melts.
Can I add other toppings?
Absolutely! Feel free to customize with nuts, sprinkles, or even coconut flakes for added flavor and texture.
How long do these last?
In the refrigerator, these tasty treats will last up to one week. If frozen properly, they can stay good for three months.
Final Thoughts
These 4th of July Oreo balls are not only delicious but also incredibly versatile. You can customize them with different toppings or flavors based on your preferences. Perfect for summer gatherings or just a sweet treat at home, give this easy no-bake recipe a try!

4th Of July Oreo Balls
- Total Time: 30 minutes
- Yield: Approximately 30 servings 1x
Description
Indulge in these delightful 4th Of July Oreo Balls, the perfect no-bake treat to celebrate Independence Day! With their vibrant red, white, and blue colors, these cookie balls are not only visually stunning but also bursting with the classic taste of Oreos combined with creamy cheesecake richness. Easy to prepare and fun to decorate, they make a festive centerpiece for summer gatherings like barbecues and picnics. Each bite is a delicious reminder of the holiday spirit, guaranteed to impress your family and friends!
Ingredients
- 1 lb Oreo Cookies
- 8 oz Cream cheese (softened)
- 12 oz Blue candy melts
- 12 oz Red candy melts
- ⅓ cup White melting wafers
- White star confetti sprinkles (for decoration)
Instructions
- Crush Oreo cookies in a food processor until fine.
- Mix crushed cookies and softened cream cheese in a bowl until well blended.
- Roll mixture into 1-inch balls and place on a parchment-lined baking sheet.
- Chill balls in the refrigerator for at least 60 minutes.
- Melt the blue, red candy melts, and white wafers separately in microwave-safe bowls.
- Dip each chilled ball into the melted coatings and let excess drip off.
- Decorate with star sprinkles while still wet.
- Return decorated balls to fridge for another hour before serving.
- Prep Time: 20 minutes
- Cook Time: 10 minutes
- Category: Desserts
- Method: No-bake
- Cuisine: American
Nutrition
- Serving Size: 1 serving
- Calories: 130
- Sugar: 12g
- Sodium: 50mg
- Fat: 7g
- Saturated Fat: 4g
- Unsaturated Fat: 2g
- Trans Fat: 0g
- Carbohydrates: 15g
- Fiber: 0g
- Protein: 1g
- Cholesterol: 10mg

Leave a Comment