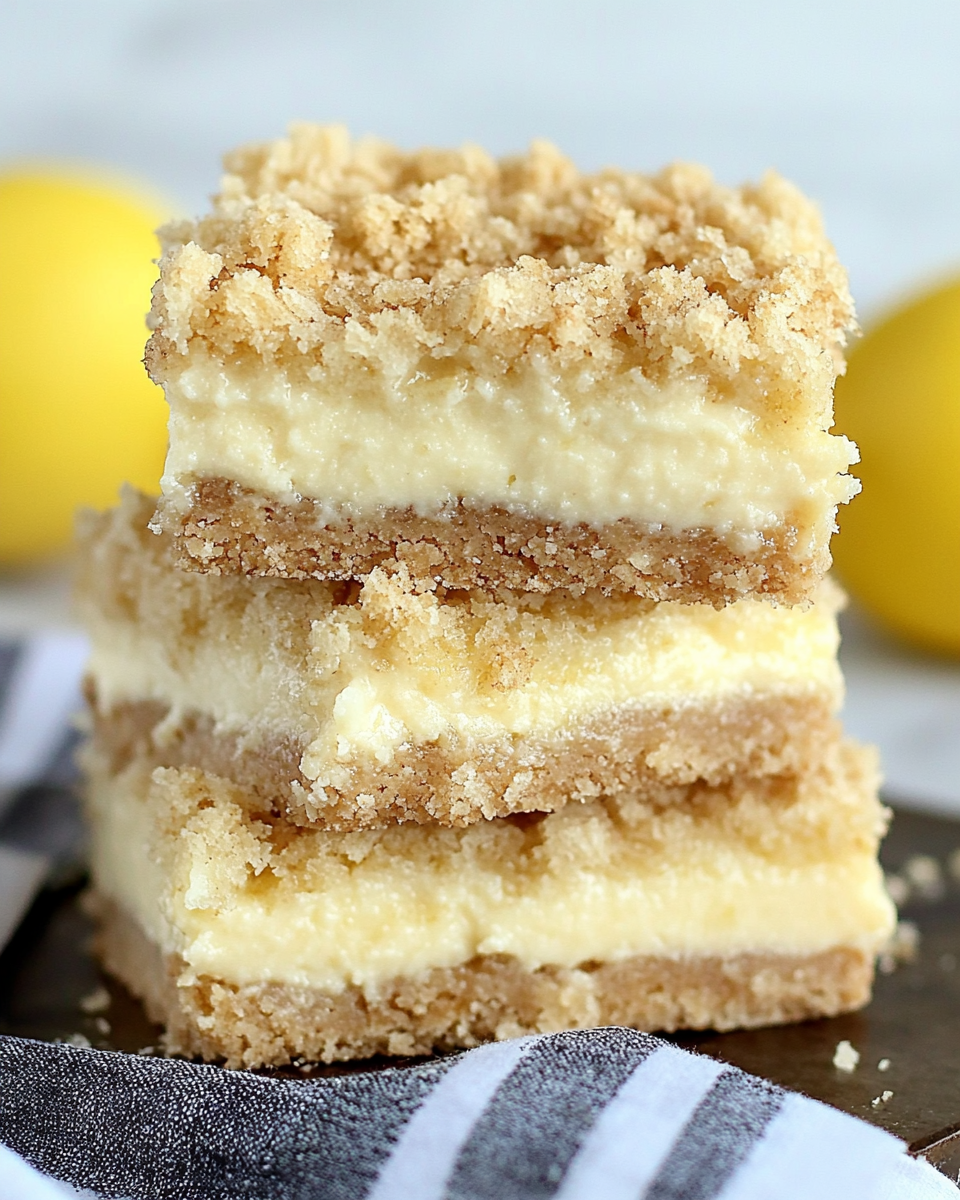
These Creamy Lemon Cheesecake Crumb Bars are a perfect balance of tangy citrus, rich cheesecake, and buttery oat crumble. With a smooth and creamy lemon cheesecake filling layered between a crisp, sweet oat crust and topping, this dessert is ideal for spring gatherings, picnics, or any time you crave something refreshing and indulgent.

Why You’ll Love This Recipe
- Deliciously Balanced Flavors – The tartness of fresh lemon juice pairs perfectly with the sweetness of brown sugar and the richness of cream cheese.
- Simple to Make – With basic pantry ingredients and easy-to-follow steps, these bars come together quickly.
- Versatile & Crowd-Pleasing – A great dessert for potlucks, parties, or just a casual treat at home.
- Make-Ahead Friendly – These bars store well in the fridge, making them a great option for preparing in advance.
Preparation Phase & Tools to Use
Before getting started, it’s essential to have all ingredients measured and tools prepared.
Essential Tools and Equipment
- 9×13-inch baking pan – Ensures the bars bake evenly.
- Mixing bowls – One for the crumb mixture and one for the cheesecake filling.
- Electric mixer or hand whisk – Helps achieve a smooth and lump-free cheesecake batter.
- Food processor (optional) – Speeds up mixing the crumble topping.
- Measuring cups and spoons – For accuracy in ingredients.
- Spatula – For even spreading of the cheesecake filling.
Preparation Tips
- Use room temperature cream cheese to ensure a smooth cheesecake filling.
- Grease the baking pan or line it with parchment paper for easy removal.
- Pre-bake the crust to ensure a firm base that holds the cheesecake layer well.
Ingredients
For the Crumb Crust & Topping:
- 2 cups all-purpose flour
- 1 ½ cups brown sugar
- 1 cup cold butter, sliced
- 1 ½ cups oats
For the Lemon Cheesecake Filling:
- 2 (8 oz.) packages cream cheese, room temperature
- ½ cup sugar
- 3 eggs
- ¼ cup milk
- 1 teaspoon vanilla extract
- ¼ cup lemon juice
- 1 teaspoon lemon zest
Step-by-Step Directions
Step 1: Preheat & Prepare the Baking Pan
- Preheat the oven to 350°F (175°C).
- Grease a 9×13-inch baking pan or line it with greased parchment paper for easy removal.
Step 2: Make the Crumb Mixture
- In a food processor, pulse the flour and brown sugar until combined.
- Add the cold butter and pulse until the mixture becomes coarse and crumbly.
- Add the oats and pulse again until just combined.
Step 3: Create the Crust
- Reserve 1 ½ cups of the crumb mixture for the topping.
- Press the remaining mixture into the bottom of the prepared baking pan, pressing lightly.
- Bake for 10 minutes to set the crust before adding the cheesecake layer.
Step 4: Prepare the Cheesecake Filling
- In a mixing bowl, beat the cream cheese and sugar until smooth and creamy.
- Add the eggs, one at a time, mixing well after each addition.
- Stir in the milk, vanilla extract, lemon juice, and lemon zest until fully incorporated.
Step 5: Assemble & Bake
- Pour the cheesecake mixture evenly over the pre-baked crust.
- Sprinkle the reserved crumb mixture over the top, pressing it gently.
- Bake for 15-20 minutes, or until the top is lightly golden brown.
Step 6: Cool & Serve
- Allow the bars to cool completely before slicing.
- For the best texture, refrigerate for at least 2 hours before serving.
Serving Suggestions
1. Serve Chilled for the Best Texture
For the perfect consistency, allow the bars to chill in the refrigerator for at least two hours before slicing. This helps them firm up, making them easier to cut and enhancing the creamy cheesecake layer.
2. Dust with Powdered Sugar
A light dusting of powdered sugar adds a touch of elegance and extra sweetness. This works especially well if you want a more decorative presentation.
3. Add a Dollop of Whipped Cream
Top each bar with a small scoop of whipped cream for added richness. For an extra lemony touch, stir in a bit of lemon zest into the whipped cream before serving.
4. Garnish with Fresh Berries
Berries like strawberries, raspberries, blueberries, or blackberries pair beautifully with the bright lemon flavor. The natural tartness of the fruit balances the sweetness of the bars.
5. Drizzle with a Sauce
- A drizzle of honey or caramel sauce adds a warm, sweet contrast to the tart lemon cheesecake.
- Raspberry or strawberry sauce provides a fruity twist that complements the citrus notes.
6. Serve with a Cup of Tea or Coffee
The creamy texture and tart flavor of these bars go well with hot beverages. A cup of earl grey tea, chamomile tea, or black coffee balances the sweetness while enhancing the overall dessert experience.
7. Pair with Ice Cream
For a more indulgent treat, serve these bars with a scoop of vanilla bean ice cream or lemon sorbet. The combination of warm, buttery crumble and cold ice cream creates a delicious contrast.
Common Mistakes to Avoid & How to Perfect the Recipe
Even simple recipes can have pitfalls. Here are some common mistakes and how to avoid them to ensure your bars turn out perfectly every time.
1. Using Cold Cream Cheese
Mistake: If the cream cheese is too cold, it won’t mix smoothly, resulting in a lumpy cheesecake filling.
Solution: Allow the cream cheese to come to room temperature before mixing. This ensures a smooth, creamy consistency.
2. Skipping the Pre-Bake Step for the Crust
Mistake: Pouring the cheesecake filling onto an unbaked crust can make the bars soggy.
Solution: Always pre-bake the crumb crust for 10 minutes to ensure a firm base.
3. Overmixing the Cheesecake Batter
Mistake: Overmixing can incorporate too much air, leading to cracks in the cheesecake layer.
Solution: Mix the batter just until smooth, avoiding excessive beating.
4. Cutting the Bars Too Soon
Mistake: If the bars aren’t fully cooled before slicing, the cheesecake layer may not hold its shape.
Solution: Let the bars cool completely at room temperature, then refrigerate for at least 2 hours before slicing.
5. Not Reserving Enough Crumb Mixture for the Topping
Mistake: Using too much crumb mixture for the crust can leave the top layer too thin.
Solution: Set aside 1 ½ cups of the crumb mixture before pressing the rest into the baking pan.
6. Overbaking the Bars
Mistake: Baking too long can result in a dry cheesecake layer.
Solution: Bake until the topping is lightly golden brown and the center is set but slightly jiggly.
Side Dish Recommendations
While these bars are delicious on their own, they pair well with light, refreshing sides that complement their flavor.
1. Fresh Fruit Salad
A mix of oranges, kiwi, berries, and grapes adds natural sweetness and freshness, balancing the richness of the cheesecake.
2. Lemon-Infused Yogurt Parfait
Layer Greek yogurt, granola, and honey for a creamy, tangy side dish that enhances the citrus flavors of the bars.
3. Honey-Glazed Nuts
Crunchy almonds, pecans, or walnuts glazed with honey add texture and a touch of caramelized sweetness.
4. Chilled Herbal Tea
A glass of mint tea or chamomile tea provides a light, refreshing contrast to the rich, buttery bars.
5. Vanilla Pudding with a Hint of Citrus
A smooth vanilla pudding with a splash of lemon or orange zest complements the cheesecake layer.
6. Raspberry Compote
A tart raspberry compote spooned over the bars enhances the fruity flavors while adding a beautiful color contrast.
7. Coconut Whipped Cream
For a dairy-free option, serve the bars with a dollop of coconut whipped cream and a sprinkle of toasted coconut flakes.
8. Almond Biscotti
For a crunchy contrast, serve these bars with a side of almond biscotti or lemon-flavored shortbread cookies.
Expert Tips for Perfect Cheesecake Bars
1. Use Fresh Lemon Juice and Zest
For the best flavor, always use freshly squeezed lemon juice rather than bottled. Fresh lemon zest enhances the citrus notes, making the bars taste brighter and more refreshing.
2. Don’t Skip the Pre-Baking Step
Pre-baking the crust ensures that it holds up under the cheesecake filling. Without this step, the bars may turn out too soft and fragile.
3. Cool Gradually for a Smooth Texture
Rapid cooling can cause cracks in the cheesecake layer. After baking, let the bars cool at room temperature for about 30 minutes before transferring them to the refrigerator.
4. Use a Sharp Knife for Clean Slices
For neat, professional-looking bars, use a sharp knife and wipe it clean between each cut. Chilling the bars for at least 2 hours before slicing makes them easier to handle.
5. Experiment with Variations
- Add a handful of chopped nuts to the crumb topping for extra crunch.
- Stir in a few tablespoons of blueberry or raspberry puree into the cheesecake filling for a fruity twist.
- Swap out vanilla extract for almond extract for a different depth of flavor.
Storage & Reheating Instructions
Refrigeration
- Store the bars in an airtight container in the refrigerator for up to 5 days.
- For the best texture, keep them chilled and serve directly from the fridge.
Freezing
- Wrap individual bars tightly in plastic wrap and place them in a freezer-safe container.
- Freeze for up to 2 months.
- Thaw in the refrigerator overnight before serving.
Reheating (If Desired)
- These bars are best served cold, but if you prefer them slightly warm, microwave a slice for 10-15 seconds.
Frequently Asked Questions (FAQs)
1. Can I make these bars gluten-free?
Yes. Substitute the all-purpose flour with a gluten-free flour blend and use certified gluten-free oats.
2. What can I use instead of cream cheese?
If you need an alternative, you can try Greek yogurt, mascarpone cheese, or ricotta cheese, though the texture and flavor may vary slightly.
3. Can I use quick oats instead of rolled oats?
Yes, but rolled oats provide a better texture. Quick oats will make the topping softer and less crumbly.
4. Why did my cheesecake layer crack?
Overmixing the batter, overbaking, or cooling too quickly can cause cracks. Mix gently, bake until just set, and let the bars cool gradually.
5. Can I add more lemon flavor?
Absolutely. Increase the lemon zest to 1 ½ teaspoons for a more intense citrus flavor.
6. Can I make these bars ahead of time?
Yes, these bars taste even better the next day after chilling. Make them up to two days in advance for best results.
7. What can I serve these bars with?
They pair well with fresh berries, whipped cream, tea, coffee, or a scoop of vanilla ice cream.
8. Can I double the recipe?
Yes, but use a larger baking dish (such as a 10×15-inch pan) and adjust the baking time slightly.
Conclusion
These Creamy Lemon Cheesecake Crumb Bars are a refreshing and indulgent treat that combines a tangy lemon cheesecake filling with a buttery, crunchy crumb crust. Whether you’re making them for a family gathering, a special occasion, or simply to satisfy a dessert craving, they are sure to impress.
By following the tips and storage guidelines, you can ensure that each bite is creamy, flavorful, and perfectly balanced. Try this recipe and enjoy a dessert that’s easy to make, delicious to eat, and ideal for any time of the year.
Creamy Lemon Cheesecake Crumb Bars
Ingredients
For the Crumb Crust & Topping:
- 2 cups flour
- 1 ½ cups brown sugar
- 1 cup cold butter sliced
- 1 ½ cups oats
For the Lemon Cheesecake Filling:
- 2 8 oz. packages cream cheese, room temperature
- ½ cup sugar
- 3 eggs
- ¼ cup milk
- 1 teaspoon vanilla extract
- ¼ cup lemon juice
- 1 teaspoon lemon zest
Instructions
- Preheat oven to 350°F (175°C). Grease a 9×13-inch baking pan or line it with greased aluminum foil.
- Prepare the crumb mixture: In a food processor, pulse the flour and brown sugar together. Add the cold butter slices and pulse until crumbly. Add the oats and pulse again until just combined.
- Create the crust: Reserve 1 ½ cups of the crumb mixture for the topping. Press the remaining mixture into the bottom of the prepared pan, packing it lightly. Bake for 10 minutes.
- Make the cheesecake filling: In a mixing bowl, beat the cream cheese and sugar until smooth. Add eggs and blend well. Mix in the milk, vanilla extract, lemon juice, and lemon zest until smooth and creamy.
- Assemble the bars: Pour the cheesecake mixture over the baked crust. Sprinkle the reserved crumb mixture evenly over the top, pressing it gently.
- Bake for 15-20 minutes, or until the top is lightly browned.
- Cool completely before cutting into bars. Store in the refrigerator until ready to serve.


Leave a Comment