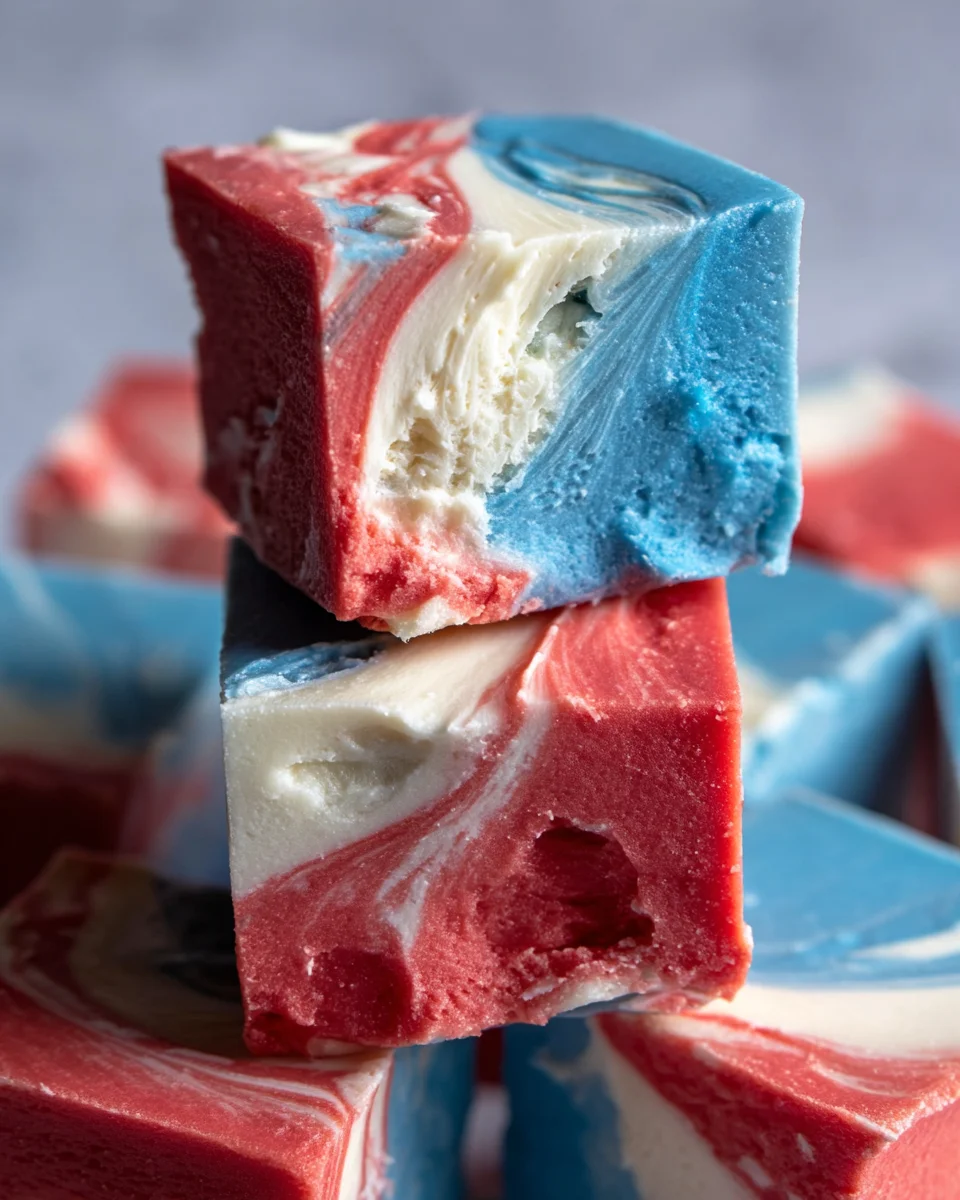
The 4th of July Tie Dyed Fudge is a delightful and colorful treat that captures the festive spirit of Independence Day. This easy-to-make fudge is perfect for family gatherings, barbecues, or any celebration where you want to add a fun touch. The vibrant red, white, and blue layers not only taste amazing but also look stunning on any dessert table, making them a hit with both kids and adults.
Why You’ll Love This Recipe
- Eye-Catching Colors: The vibrant layers of red, white, and blue make this fudge visually appealing for any celebration.
- Easy to Make: With simple ingredients and straightforward steps, even novice bakers can create this delicious treat.
- Versatile Flavor: The combination of marshmallow creme and white chocolate delivers a sweet flavor that pairs well with various occasions.
- Fun for Kids: Kids will love helping out with the layering and mixing, making it a fun family activity.
- Perfect for Sharing: Cut into small squares for easy serving at parties or family picnics.
Tools and Preparation
To create the perfect 4th of July Tie Dyed Fudge, you’ll need some essential tools. Having the right equipment will simplify your process and ensure great results.
Essential Tools and Equipment
- Heavy-bottomed saucepan
- Heat-safe bowls (3)
- Spatulas (3)
- 9×5 loaf pan
- Knife
Importance of Each Tool
- Heavy-bottomed saucepan: Helps distribute heat evenly and prevents burning while boiling the fudge mixture.
- Heat-safe bowls: Necessary for dividing the fudge into colors without melting or warping from heat exposure.
- Spatulas: Used for mixing ingredients smoothly without introducing air into the fudge.
Ingredients
For the Fudge Base
- 2 1/2 cups sugar
- 1/2 cup unsalted butter
- 1 5-oz can evaporated milk
- 2 cups marshmallow creme
- 1 1/3 cups white chocolate chips
- 1 teaspoon vanilla extract
For Coloring
- Red gel food coloring
- Blue gel food coloring
How to Make 4th of July Tie Dyed Fudge
Step 1: Prepare Your Pan
- Line a 9×5 loaf pan with foil, leaving some overhang for easy removal later. Set aside.
Step 2: Boil the Base Mixture
- In a large saucepan, combine unsalted butter, sugar, and evaporated milk.
- Bring to a boil over medium heat while stirring constantly.
- Continue boiling for about 5 minutes.
Step 3: Add Remaining Ingredients
- Remove from heat and stir in marshmallow creme, white chocolate chips, and vanilla extract.
- Mix until everything is melted and smooth.
Step 4: Color the Fudge
- Quickly divide the melted fudge into three separate heat-safe bowls.
- Add red gel food coloring to one bowl and blue gel food coloring to another.
- Use spatulas dedicated to each color to mix in the colors without blending them together.
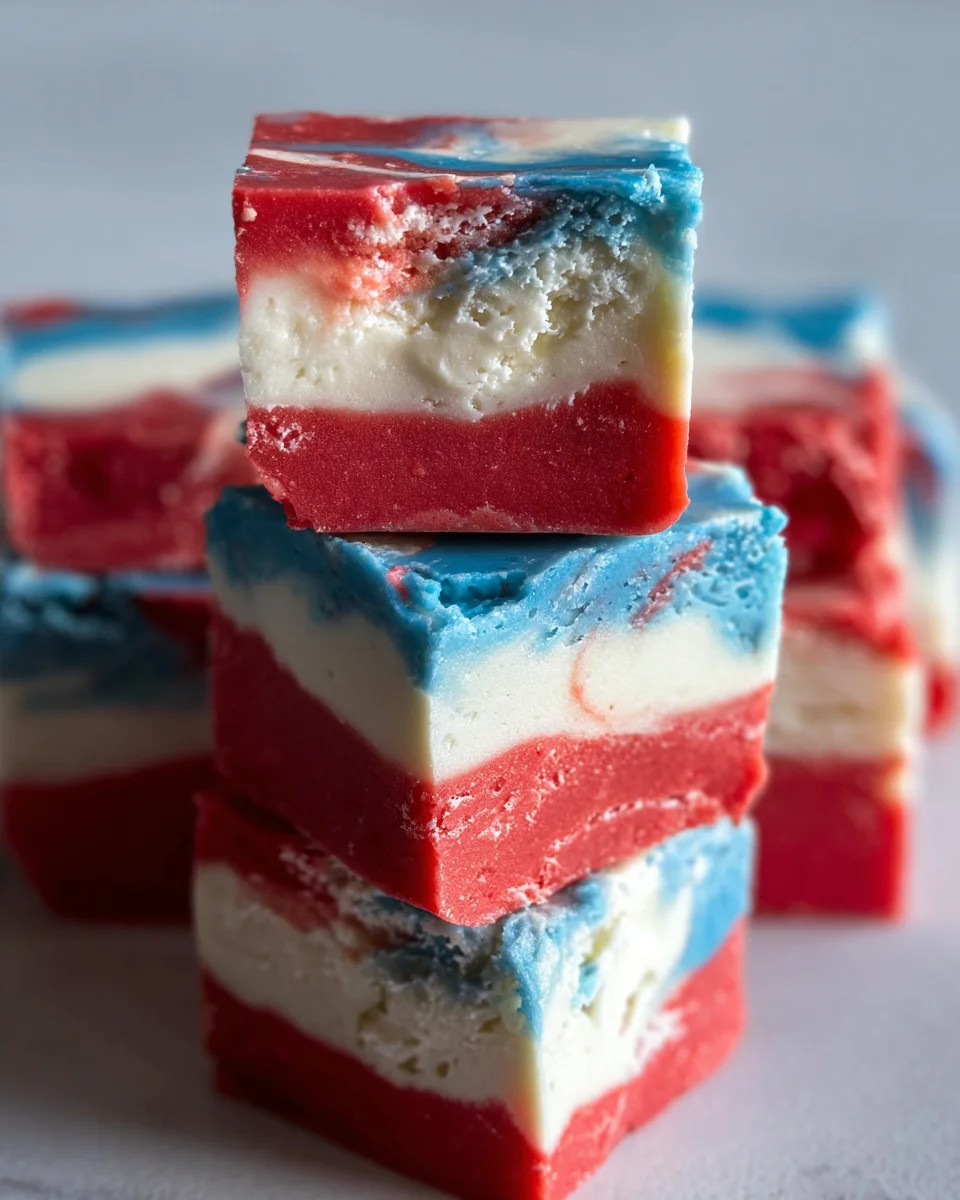
Step 5: Layer the Fudge in the Pan
- Pour the red fudge into the prepared loaf pan as the first layer.
- Follow with a layer of plain white fudge.
- Finally, add the blue fudge on top.
- Smooth each layer with a clean spoon before adding the next.
Step 6: Create Tie-Dye Swirls
- Take a knife and gently drag it through all layers in a zigzag motion—don’t touch the bottom too hard!
- Work quickly since this fudge sets fast.
Step 7: Set and Cut
Allow your fudge to set at room temperature for at least 2 hours before cutting it into small squares about 1 inch wide. Enjoy your festive creation!
How to Serve 4th of July Tie Dyed Fudge
Serving 4th of July Tie Dyed Fudge can elevate your holiday celebration. This colorful fudge is not only a treat for the taste buds but also a feast for the eyes. Here are some fun ways to present and enjoy this festive dessert.
Individual Portions
- Use small paper cups – Portion the fudge into mini cups for easy serving at parties.
- Wrap in colorful foil – Individually wrap squares in festive foil for a delightful surprise.
Fudge Platter
- Create a fudge platter – Arrange the fudge squares on a red, white, and blue themed platter for a striking display.
- Add fresh berries – Garnish with strawberries and blueberries to enhance the patriotic theme.
Party Favors
- Fill mason jars – Pack fudge pieces into mason jars tied with ribbon as party favors.
- Include recipe cards – Attach a card with the recipe so guests can recreate this treat at home.
Themed Dessert Table
- Incorporate other desserts – Pair with other 4th of July desserts like berry pies or cupcakes for variety.
- Use festive decorations – Decorate the table with stars and stripes to match the theme.
How to Perfect 4th of July Tie Dyed Fudge
Perfecting your 4th of July Tie Dyed Fudge can take your dessert from good to great. Here are some helpful tips to ensure it turns out just right.
- Use fresh ingredients – Fresh butter and high-quality chocolate chips make a big difference in flavor.
- Don’t overheat – Keep an eye on the fudge mixture; overheating can cause it to lose its creamy texture.
- Layer carefully – Pour each color slowly to create distinct layers without mixing them together.
- Drag quickly – When making swirls, do it swiftly to maintain the fudge’s shape before it sets.
- Store properly – Keep leftovers in an airtight container at room temperature for best results.
Best Side Dishes for 4th of July Tie Dyed Fudge
Pairing your 4th of July Tie Dyed Fudge with delicious side dishes can enhance your holiday meal. Here are some great options that complement this sweet treat beautifully.
- Grilled Corn on the Cob – Sweet corn brushed with butter is a classic summer side that everyone loves.
- Potato Salad – A creamy potato salad adds heartiness and balances the sweetness of the fudge.
- Coleslaw – Crisp and tangy coleslaw provides a refreshing contrast to rich desserts like fudge.
- BBQ Ribs – Smoky BBQ ribs offer savory flavors that pair nicely with sweet treats.
- Watermelon Wedges – Juicy watermelon is hydrating and adds a burst of freshness to your plate.
- Caprese Skewers – Fresh mozzarella, tomatoes, and basil drizzled with balsamic create a light appetizer.
These side dishes will round out your 4th of July celebration while allowing your tie dyed fudge to shine!
Common Mistakes to Avoid
Making 4th of July Tie Dyed Fudge can be a fun experience, but a few common mistakes can ruin your festive treat.
- Misjudging Cooking Time: Overcooking the fudge mixture can lead to a grainy texture. Always boil for exactly 5 minutes while stirring constantly to avoid this issue.
- Skipping the Layering Technique: Not layering the colors properly will result in a muddled appearance. Pour each layer carefully and smooth it out before adding the next.
- Using the Wrong Pan Size: A pan that is too small will cause the fudge to overflow. Stick with a 9×5 loaf pan for best results.
- Ignoring Setting Time: Cutting into the fudge too soon may make it fall apart. Allow it to set for at least 2 hours before slicing for clean squares.
- Not Using Fresh Ingredients: Stale or old ingredients can impact flavor and texture. Always use fresh butter and chocolate chips for optimal taste.
Refrigerator Storage
- Store in an airtight container.
- Can last up to one week in the refrigerator.
Freezing 4th of July Tie Dyed Fudge
- Wrap tightly in plastic wrap or foil.
- Store in an airtight freezer bag or container.
- Can be frozen for up to three months.
Reheating 4th of July Tie Dyed Fudge
- Oven: Preheat to 350°F, place fudge in a baking dish, cover with foil, and warm for about 10 minutes.
- Microwave: Heat in short bursts of 10-15 seconds until slightly softened. Be careful not to melt completely.
- Stovetop: Use a double boiler on low heat, stirring gently until warmed through.
Frequently Asked Questions
What is 4th of July Tie Dyed Fudge?
4th of July Tie Dyed Fudge is a colorful dessert featuring red, white, and blue layers made from sugar, butter, marshmallow creme, and white chocolate.
How long does it take to prepare?
The preparation time is around 20 minutes, followed by at least 2 hours for setting before you can cut it into squares.
Can I customize the colors?
Absolutely! You can use different gel food coloring to match any theme or occasion. Just remember not to mix colors when preparing layers.
Is this fudge suitable for kids?
Yes! This recipe is easy and fun for kids to help with, making it an excellent choice for family gatherings or celebrations.
How should I store leftover fudge?
Store leftover fudge in an airtight container in the refrigerator for up to a week or freeze it for later use.
Final Thoughts
This 4th of July Tie Dyed Fudge is not only a vibrant centerpiece for your holiday table but also versatile enough for any celebration. With options for customization like different colors or flavors, you can make this treat unique every time. Give it a try and enjoy this delightful dessert with friends and family!
4th of July Tie Dyed Fudge
- Total Time: 25 minutes
- Yield: Approximately 16 servings 1x
Description
Celebrate Independence Day with this vibrant 4th of July Tie Dyed Fudge, a delightful dessert that embodies the spirit of summer festivities. This easy-to-make treat features luscious layers of red, white, and blue fudge that not only taste amazing but also look stunning on any dessert table. Perfect for family gatherings or barbecues, this colorful fudge is sure to impress both kids and adults alike. Its sweet flavor, derived from marshmallow creme and white chocolate, makes it a versatile addition to any celebration. Enjoy the fun of layering colors and creating eye-catching swirls in this festive treat!
Ingredients
- 2 1/2 cups sugar
- 1/2 cup unsalted butter
- 1 can (5 oz) evaporated milk
- 2 cups marshmallow creme
- 1 1/3 cups white chocolate chips
- 1 teaspoon vanilla extract
- Red and blue gel food coloring
Instructions
- Prepare a 9×5 loaf pan by lining it with foil.
- In a heavy-bottomed saucepan, combine sugar, butter, and evaporated milk; bring to a boil over medium heat while stirring constantly for about 5 minutes.
- Remove from heat; stir in marshmallow creme, white chocolate chips, and vanilla until smooth.
- Divide the mixture into three bowls; tint one red and another blue using gel food coloring.
- Layer the red fudge at the bottom of the pan followed by plain white fudge and then blue fudge. Smooth each layer before adding the next.
- Create tie-dye swirls with a knife through all layers.
- Allow to set at room temperature for at least 2 hours before cutting into small squares.
- Prep Time: 20 minutes
- Cook Time: 5 minutes
- Category: Dessert
- Method: Baking
- Cuisine: American
Nutrition
- Serving Size: 1 serving
- Calories: 130
- Sugar: 18g
- Sodium: 10mg
- Fat: 6g
- Saturated Fat: 3g
- Unsaturated Fat: 2g
- Trans Fat: 0g
- Carbohydrates: 19g
- Fiber: 0g
- Protein: 1g
- Cholesterol: 10mg


Leave a Comment